If you’ve ever dreamed of roasting your own chestnuts while the weather turns cold, you’re not alone. Chestnut trees look majestic in the landscape and reward you with sweet, starchy nuts just when most of the garden is winding down.
In this guide, I’ll cut through the confusing advice and share clear, actionable steps to planting, growing, and harvesting chestnut trees at home. You’ll learn how to match your climate and soil to the right spot, plant seeds or saplings the right way, avoid blight where possible, and bring in baskets of nuts safely and efficiently.
When I planted my first chestnut, I underestimated how long it would live and how quickly it would grow. Now, every fall, I’m reminded that a little planning and care early on pays off for decades. Let’s set your future self up for the same kind of harvest.
Why Growing Chestnut Trees at Home Really Matters

From Holiday Treat to Long-Lived Shade Tree
Chestnuts aren’t just for festive songs and winter recipes. A mature chestnut tree can be a beautiful, long-lived centerpiece in your yard, offering shade, wildlife habitat, and a reliable food source. Backyard chestnut trees can be surprisingly productive, offering a bountiful harvest that you can enjoy fresh or in a variety of recipes, as highlighted in this Backyard Fruit Bowl article.
Chestnut trees in the genus Castanea are deciduous, with glossy, serrated leaves and showy white blooms that turn into spiky husks full of nuts by fall. Some species become huge, single-trunk trees, while others stay smaller and form multi-stemmed shrubs.
Chestnut Tree Overview at a Glance
Before you plant, it helps to know what you’re signing up for. I like to think of chestnut trees as low-input, high-reward plants once they’re established. Despite their humble reputation, chestnuts have a lot to offer in terms of flavor, nutrition, and landscape beauty, making them worth reconsidering for home gardens. You can read more about why this humble nut deserves a comeback.
- Plant Type: Deciduous nut tree
- Family: Fagaceae
- Genus: Castanea
- Species: Multiple (American, Chinese, European, hybrids, and chinquapins)
- Native Area: Temperate regions of North America, Europe, and Asia
- Exposure: Full sun to light partial shade
- Height: About 15–100 feet, depending on species and cultivar
- Water Needs: Low once established; consistent moisture while young
- Soil Type: Well-drained, neutral to slightly acidic soils
- Hardiness: Generally USDA zones 4–9 (species-dependent)
- Pests & Diseases: Chestnut blight, leaf spots, powdery mildew, borers, and weevils
- Maintenance: Average; occasional pruning and cleanup
A Quick Personal Story
When I planted my first chestnut, I assumed it would behave like a fruit tree and need constant babying. I checked the soil every other day, fussed over fertilizer, and worried about every leaf spot.
What actually mattered most was good planting, the right light, and patience. Once the tree settled in, it shrugged off heat and occasional drought like a champ. That experience still guides how I suggest people care for their own trees today.
Know Your Chestnut: Native Range and Key Traits

Native Area and Climate Sweet Spot
Chestnut species come from temperate regions across the Northern Hemisphere. They’re naturally adapted to cool winters, warm summers, and plenty of sunlight.
In home gardens, most chestnuts thrive where you can offer:
- Cold winters: Necessary for dormancy and long-term health.
- Long, warm growing seasons: Helps flowers develop into full, sweet nuts.
- Good air flow and sun: Reduces disease pressure and encourages strong wood.
Most commonly grown chestnut trees do well in USDA hardiness zones 4–9, though particular cultivars may be better suited to the warmer or cooler end of that range.
Seasonal Look: Flowers, Foliage, and Nuts
Chestnuts offer something interesting in every season, which is one reason I love them in the landscape.
- Spring: Buds swell and open into lush, glossy green leaves.
- Early summer: Long, pale catkin-like flowers appear, often fragrant and buzzing with pollinators.
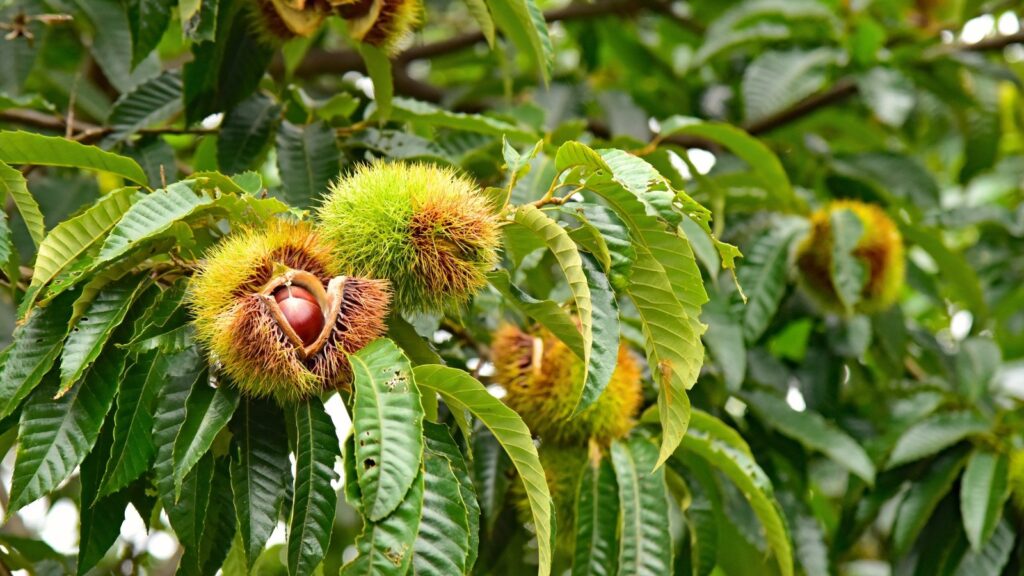
- Late summer to fall: Spiky green burrs fatten and eventually split to reveal shiny brown nuts.
- Late fall and winter: Leaves drop, exposing ridged, textured bark and a strong branch structure.
As fall approaches, the foliage often turns yellow to golden before carpeting the ground, adding a classic autumn look around your tree.
Pollination and Blight Resistance Basics
Each tree produces both male and female flowers, but most chestnut varieties are not reliably self-fertile. For good nut production, you’ll usually need at least two genetically different trees nearby.
- Plant at least two trees: Space them where pollen can easily travel between them (same species or compatible hybrids).
- Know the exceptions: Some species like the Chinese chinquapin (Castanea henryi) can self-pollinate but still do better with a partner.
Historically, the American chestnut (C. dentata) was devastated by chestnut blight caused by the fungus Cryphonectria parasitica. If you live in an area where blight is common, I strongly suggest:
- Choosing blight-resistant hybrids: Often American x Chinese or other mixes bred for resistance.
- Trying smaller chinquapin species: Such as American chinquapin (C. pumila), which tends to be more tolerant.
Planting Chestnut Trees the Right Way (Seeds and Saplings)

Choosing Seed vs. Sapling for Your Garden
One of the first decisions you’ll face is whether to start from seed or buy a sapling. I like to think of seeds as a long-term experiment and saplings as the fast-track to harvest.
- Saplings (best for nuts soon): If you want chestnuts within a few years, choose container-grown or bare-root saplings.
- Seeds (best for fun and breeding: Great if you’re curious, want to select for local blight resistance, or don’t mind waiting.
- Local nurseries or specialty growers: These often carry regionally adapted, disease-resistant selections.
Step-by-Step: Transplanting a Young Chestnut

Transplanting well is the single best favor you can do for your future tree. I always slow down for this step so I don’t have to correct problems for years afterward.
- 1. Pick the right spot: Full sun, well-drained soil, and plenty of space for the mature canopy.
- 2. Dig a wide hole: Make it as deep and about twice as wide as the root ball or root spread.
- 3. Prepare bare-root trees: Build a small mound in the center of the hole, spread the roots over it, and keep the root flare at soil level.
- 4. For balled-and-burlapped trees: Set the root ball in the hole, cut and fold back the top of the burlap, and remove any twine around the trunk.
- 5. Backfill with native soil: Firm gently as you go to remove air pockets but avoid compacting it. Similar to spring bulbs, chestnuts benefit from proper mulching after planting; you can read more about timing and techniques in this guide on planting and mulching spring bulbs.
- 6. Water deeply: Soak the root zone right after planting, then check for settling and top up with soil if needed.
- 7. Mulch wisely: Apply 2–3 inches of compost or straw around the planting area, but keep a gap of a couple of inches around the trunk.
Growing Chestnut Trees From Seed

Starting chestnuts from seed takes patience, but it’s incredibly satisfying. I like to sow a mix of seeds and then keep the strongest seedlings.
- Collect ripe nuts: Harvest when burrs split and nuts fall or can be easily removed.
- Use fresh, viable nuts: Avoid dried-out or moldy ones; they’re unlikely to sprout well.
- Sow in pots or directly in the ground: Plant as soon as nuts start dropping in fall. You might also consider other seeds that thrive when sown in November; check out this November flower seed guide for ideas.

- Plant at the right depth: Bury nuts about 1–2 inches deep in a well-draining mix.
- Keep evenly moist: Aim for consistently damp (not soggy) soil while seedlings establish.
- Pot up or transplant later: After the first year, move them to larger containers or a permanent spot once they’re a few inches tall.
Seedlings grown directly in the ground often develop stronger taproots than those started in containers, which can make them more drought-tolerant later on.
Propagating From Cuttings and Saving Seed

Chestnuts are notoriously tricky from cuttings, but you can still try if you enjoy propagation experiments.
- Softwood cuttings: Take 4–6 inch pieces in late spring or early summer after leaves have opened.
- Hardwood cuttings: Take dormant wood in fall or winter.
- Use well-draining potting mix: Remove lower leaves, insert stems, and keep the medium moist but not waterlogged.
- Provide humidity: Use a humidity dome or clear bag to reduce moisture loss while roots form.
Because cuttings don’t always cooperate, I also like to save seed every harvest.
- Save the best nuts: Choose large, healthy, undamaged nuts from your favorite trees.
- Store properly: Keep them in paper, glass, or plastic containers in a cool, dark, slightly humid place.
- Use the refrigerator if needed: Seal in containers so they don’t dry out before planting.
Everyday Care: Light, Water, Soil, and Feeding

Light Chestnut Trees Really Need
Most of the chestnut problems I see in home gardens start with not enough light. These trees are sun-lovers.
- Full sun is best: Aim for at least 6 hours of direct sunlight daily for strong growth and nut production.
- Light partial shade is acceptable: Trees will survive with 2–3 hours of direct sun plus bright, dappled light for the rest of the day.
- Too much shade: Encourages lanky, weak growth and fewer nuts.
If you can, position your tree where taller trees don’t cast heavy shade over it during the main part of the day.
Watering Without Causing Root Rot

Chestnuts love consistent moisture while young but are quite drought-tolerant when mature. I’ve learned to water deeply but not often.
- Young trees: Water regularly through the first few growing seasons, allowing the top inch of soil to dry slightly between waterings.
- Mature trees: Usually only need supplemental water during extended droughts.
- Avoid soggy conditions: Constantly wet soil invites root rot and other diseases.
Use the finger test: poke your finger 1–2 inches into the soil. If it still feels moist, wait before watering again.
Soil and Mulch That Keep Trees Happy
Chestnut trees are surprisingly forgiving, but they draw the line at heavy, waterlogged soils.
- Well-drained soil is essential: Loams or sandy loams are ideal, but they can handle marginal, rocky, or clay-heavy soils if drainage is improved.
- pH preferences: Neutral to slightly acidic soil (roughly 5.5–6.5) keeps nutrients available.
- Organic matter helps: Yearly additions of compost improve structure and fertility.
Mulch is one of my favorite tools for chestnut care: it keeps roots cool, conserves moisture, and mimics the natural forest floor.
- Apply 2–3 inches of mulch: Use compost, shredded leaves, or straw.
- Leave a mulch-free ring: Keep a 2–3 inch gap around the trunk to prevent rot and rodent damage.
When (and If) to Fertilize

One thing I love about chestnuts is that they usually don’t beg for fertilizer. Many trees do beautifully with nothing more than regular compost.
- Start with a soil test: Check pH and nutrient levels before adding anything.
- Correct pH first: If soil is too alkaline, consider sulfur or acid-forming organic amendments.
- Focus on organic matter: Annual compost top-dressings are often enough.
- Use balanced fertilizer sparingly: If tests show low nitrogen, phosphorus, or potassium, apply a balanced product lightly in early spring.
Too much fertilizer can produce lush, tender growth that’s more prone to pests and winter damage, so when in doubt, go light.
Harvesting, Storing, and Enjoying Your Chestnuts

Telling When Chestnuts Are Ready to Pick

Chestnuts ripen in late summer to fall, depending on your climate and variety. I watch the burrs closely—the tree will tell you when it’s time.
- Look for splitting burrs: When the spiky husks crack open, the nuts inside are usually ready.
- Check for color and shine: Ripe nuts are glossy, firm, and richly brown.
- Harvest daily during peak: For large trees, gather fallen nuts each day so they don’t get moldy or eaten.
On younger, smaller trees, you can pick burrs by hand with gloves, dropping them into a bucket to open later.
Safely Opening Husks and Prepping Nuts
Those spiky burrs are not gentle on bare hands, so I always treat this step with respect.
- Wear gloves: Use sturdy gardening gloves to handle the burrs.
- Crack or cut the burrs: Press or cut along the seam to pop them open and free the nuts.
- Sort as you go: Discard any damaged, wormy, or moldy nuts.
Once you have a bowl of clean nuts, you can decide whether to cook them right away or store them for later. For detailed guidance on harvesting and cooking, check out this step-by-step chestnut guide.
Storage and Simple Ways to Use Your Harvest
Fresh chestnuts have a relatively high moisture content, so proper storage matters. I usually divide my harvest into “cook now” and “save for later” piles.
- Short-term storage: Keep fresh nuts in a cool, dry drawer, pantry, or breathable container.
- Refrigeration: Store in the fridge in a breathable bag or container so they don’t dry out completely.
- Roast or boil for flavor: Many people prefer the taste and texture after cooking.
Once cooked, chestnuts are incredibly versatile.
- Snack on them warm: A simple roasted chestnut is hard to beat on a chilly day.
- Add to recipes: Toss into stuffing, soups, grain bowls, or salads.
- Make chestnut “nut butter”: Blend roasted nuts alone or with other nuts for a rich spread.
Troubleshooting Chestnut Problems: Pests, Disease, and FAQs
Common Pests to Watch For

Chestnuts are tough, but they’re not immune to pests. I’ve learned to scan leaves and burrs regularly so I can catch issues early.
- Aphids: Tiny sap-suckers that cluster on tender shoots and undersides of leaves; often controlled by a strong spray of water.
- Gall wasps: Cause strange growths (galls) on stems and leaves; pruning out affected twigs can help.
- Weevils: Small beetles whose larvae burrow into nuts; protect crops with netting and timely harvest.
- Borers: Insects that tunnel into trunks and branches, usually in already stressed trees.
Because borers are so hard to manage once they’re inside the wood, I focus on keeping the tree vigorous with proper water, soil, and pruning. For serious infestations, it’s wise to consult a certified arborist.
Chestnut Blight and Other Diseases

By far the most serious disease of chestnuts is chestnut blight. It wiped out most of the native American chestnuts in the early 1900s.
- Chestnut blight: Causes cankers on stems and trunks, eventually girdling and killing branches or entire trees.
- Leaf spots: Various fungi and bacteria create brown or tan spots, usually more cosmetic than deadly.
- Powdery mildew: White, powdery coating on leaves, common in shady, humid conditions.
Unfortunately, there’s no simple spray that solves blight on susceptible trees. The smartest strategy is prevention.
- Choose resistant species or cultivars: Look for hybrids or non-American species bred for resistance.
- Promote airflow: Prune crowded branches and avoid planting in enclosed, stagnant areas.
- Improve drainage: Wet, poorly drained soil stresses trees and makes disease worse.
Quick Answers to Popular Chestnut Questions
Over time, I hear the same questions about chestnut trees again and again. Here are the quick, practical answers I share.
- Why did so many American chestnut trees die? A fungal disease called chestnut blight killed most native American chestnuts in the 20th century. Breeding efforts continue to develop resistant forms.
- Are chestnut trees fast-growing? Yes. In good conditions with full sun, many young chestnut trees grow quite quickly, especially in their first decade.
- Can chestnut trees self-pollinate? Some can, but most yield far better with at least one other compatible chestnut nearby for cross-pollination.
Smart Chestnut Tree Care Checklist
Caring for chestnut trees is really about getting the basics right and then letting time work for you. Here’s a quick-reference summary you can use as you plan and maintain your trees.
| Care Aspect | Best Practice | What to Watch For |
|---|---|---|
| Light | Full sun (6+ hours), light partial shade acceptable | Leggy growth, poor nut set in deep shade |
| Water | Consistent moisture while young, deep but infrequent | Root rot in soggy soil; wilting in prolonged drought |
| Soil | Well-drained, neutral to slightly acidic, rich in organic matter | Standing water, very alkaline soil, or extreme compaction |
| Fertilizer | Light compost annually; add nutrients only if tests show deficits | Excessive, soft growth from overfertilizing |
| Climate | USDA zones 4–9, cold winters and warm summers | Severe winter injury outside recommended zone |
| Harvest | Collect when burrs split and nuts are glossy and firm | Moldy, wormy, or shriveled nuts if harvest is delayed |
| Pests & Disease | Choose resistant varieties; maintain vigor and airflow | Weevils in nuts, borers in trunks, blight cankers |
Practical Checklist for Your Chestnut Trees
- Pick your site: Full sun, well-drained soil, and space for a large tree canopy.
- Select your trees: Choose blight-resistant species or hybrids suited to your hardiness zone.
- Plant with care: Set the root flare at soil level, water deeply, and mulch with a 2–3 inch layer.
- Water wisely: Keep young trees consistently moist but never waterlogged.
- Feed the soil: Add compost annually and only use fertilizer when tests say it’s needed.
- Prune and monitor: Remove dead, damaged, or diseased wood and watch for pests and disease. For a visual reference on careful winter pruning, you can see techniques used for other plants, like in this hibiscus cutback guide.
- Harvest on time: Gather nuts as burrs split, sort out damaged ones, and store the best.
If you approach chestnut care with this kind of smart, observant mindset, your trees can easily outlive you and continue feeding people (and wildlife) for generations.
I’d love to hear about your own chestnut experiments and successes. Share your questions, wins, and challenges in the comments over at Plant Care Dairy so we can keep learning from each other.
Disclaimer: This article is for informational and educational purposes only. Always consider your local climate, soil conditions, and regulations, and consult with a certified arborist, extension service, or local gardening professional before making major planting, pruning, or pest management decisions.