If you’ve been curious about homegrown superfoods but aren’t sure where to start, this guide cuts through the noise and shows you exactly how to grow sorghum—simply and successfully. I’ll walk you through timing, sun, spacing, soil, watering, pest control, and the two big harvest paths (grain or syrup), so you can skip guesswork and get results.
By the end, you’ll know how to choose the right seeds, set up your bed, nail your watering and feeding rhythm, and harvest for your goals. I’ll also share a quick-reference table and a practical checklist you can use right in the garden.
When I first tried sorghum, I was surprised by how forgiving it was compared with fussier backyard crops. I sowed late, battled a dry spell, and still ended up with tall, handsome stalks. Once I matched warm planting temps, full sun, and a steady nitrogen feed, the difference in vigor and yield was dramatic.
Why Sorghum Belongs In Your Garden
What Makes Sorghum A Superfood
Sorghum (Sorghum bicolor) is a naturally gluten‑free ancient grain with impressive fiber. It’s versatile in the kitchen (think whole grain, popped, or milled), and it doubles as a homestead workhorse for syrup and crafting. Interest in sorghum has grown beyond homesteads, and this feature on why sorghum is considered a wonder grain explores its appeal in both modern gardens and kitchens. If you want a broader look at how sorghum fits into homesteading and small-scale food production, this detailed guide on growing sorghum for gardeners and homesteaders explains varieties, uses, and expectations in more depth.
- High fiber, gluten‑free: A smart pantry staple for diverse diets.
- Multiple uses: Grain cookery, sweet syrup, animal feed, brewing, and even handmade brooms.
- Low input, high resilience: It’s drought‑tolerant once established, yet responds with higher yields when soil stays evenly moist.
Where Sorghum Thrives (Zones And Heat)
Sorghum adapts broadly and is suitable to grow in USDA Zones 2–11. What really boosts yield is summer heat—expect the best performance where seasonal highs regularly hover around 80–90°F. For gardeners comparing sorghum with other warm-season crops, Epic Gardening’s overview of how the sorghum plant grows in hot climates provides helpful growing context.
- Heat lover: Warm soils and long, hot summers mean faster growth and fuller seed heads.
- Cold caution: Sorghum is frost‑tender; sow after danger of frost when the ground has warmed.
How Sorghum Grows (Habit And Timeline)
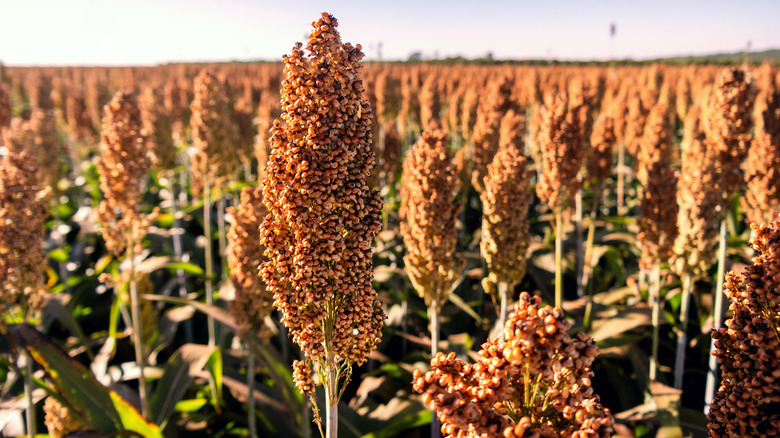
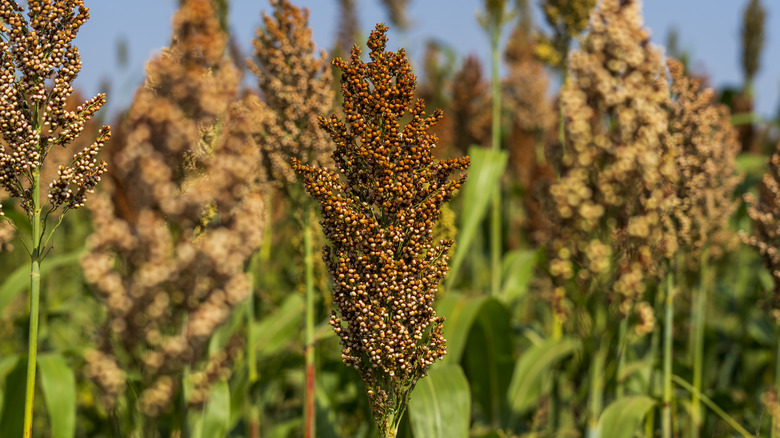
Sorghum grows as upright clumps of long, grassy foliage with sturdy canes reaching roughly 2–5 feet, depending on variety and conditions. In mid to late season, tight clusters of flowers (panicles) form and fill into glossy seeds.
- Long day, full sun: Sorghum thrives with abundant light—target 12–14 hours of direct sun exposure in the growing season.
- Flexible finish: Harvest timing depends on your goal—soft seed for syrup, hard glossy seed for grain.
Long‑Term Storage And Survival Value
With proper drying and cool, dark, airtight storage, sorghum grain can keep well, making it a great fit for preparedness‑minded gardens. Under ideal conditions, properly stored sorghum can last up to 10 years, giving it standout value in any long‑term pantry plan.
Preparation: Seeds, Site, And Soil
Choose Reliable Seed Sources
Because sorghum seed racks are thinner than tomato or lettuce displays, I often order ahead to get the variety I want. Look for reputable sources with diverse options, including heirlooms and syrup types.
- Shop locally first: Check nurseries and farm stores for regional picks.
- Explore specialty catalogs: You’ll find a wider range of grain, forage, and sweet sorghums online.
- Pick for purpose: Choose grain types for staple use or sweet types for syrup pressing.
Pick A Full‑Sun Location
Sorghum loves light. Choose an open bed or field space with uninterrupted sun for most of the day. The more direct light you can offer in the growing season (aim for 12–14 hours), the better the chances for heavy, well‑filled heads. This same full-sun principle applies to many edible plants, including citrus—something you’ll also notice when learning how to grow calamondin oranges indoors.
- Avoid shade traps: Don’t plant near tall trees or buildings that cast long afternoon shadows.
- Mind wind: A little shelter can reduce lodging (bending) in stormy areas.
Prep Soil And Feed Nitrogen
Plant sorghum in well‑drained soil. Before sowing, work in organic matter and a nitrogen‑heavy fertilizer to support vigorous growth.
- Drainage first: Raised rows or beds help in heavy soils.
- Pre‑plant boost: Blend a balanced organic compost with a nitrogen‑forward amendment according to label rates.
Bed Setup, Spacing, And Weed Prevention
Plan for efficient spacing and early weed control. Sorghum gets self‑sufficient once it’s out of the seedling stage, but weeds are aggressive early on. Early competition affects many fast growers, a challenge gardeners also face when starting how to grow cress indoors.
- Sow specifics: Plant seeds 1 inch deep and 6 inches apart.
- Weed strategy: Keep the bed clean for the first month so seedlings don’t compete for nitrogen and moisture.
- Mulch later: Add mulch once plants are established to suppress late weeds.
The 12 Must‑Know Steps To Grow Sorghum At Home
Follow These 12 Steps
- Wait For Consistent Warmth: Sow after the last frost when days are warm and nights no longer dip cold; sorghum thrives in sustained heat, especially where summers sit near 80–90°F.
- Prepare A Well‑Drained Bed: Loosen soil and incorporate compost plus a nitrogen‑heavy fertilizer to fuel leaf and cane growth.
- Sow At The Right Depth: Plant seeds 1 inch deep and 6 inches apart for sturdy, evenly spaced stands.
- Choose Maximum Sun: Give plants 12–14 hours of direct light in the growing season to build strong panicles and high grain fill.
- Water In Thoroughly: After sowing, water deeply so the top few inches of soil are moist; consistent moisture speeds germination.
- Keep Early Weeds Out: Hand‑weed or lightly hoe so seedlings don’t compete for nitrogen and water during the first 3–4 weeks.
- Thin To Final Spacing: If you over‑sowed, thin promptly to maintain roughly 6 inches between plants, favoring the strongest seedlings.
- Feed On A Schedule: Side‑dress or top‑dress every six weeks through the season with a nitrogen‑forward fertilizer to sustain vigorous growth.
- Adopt A Deep‑Water Rhythm: For best yields, water generously about every 10 days; in intense heat or sandy soil, check sooner and adjust.
- Guard Against Birds: Use netting, reflective tape, or fluttering streamers as heads form so birds don’t strip developing seed.
- Scout For Insects: Watch for aphids (sticky honeydew, curled leaves) and sorghum midge (poor seed set); respond quickly with physical removal, sprays labeled for edibles, or biological controls.
- Plan Your Harvest Goal: For syrup, cut canes when seeds are still soft; for grain, wait for hard, glossy seeds that resist a thumb‑nail dent.
Time Your Sowing
Direct sow in late spring once it’s reliably warm—typically May or June in many regions. Sorghum is frost‑sensitive, so waiting for warm soil and settled weather sets you up for fast, even germination.
Watering And Fertilizing Rhythm
Sorghum can tolerate dry spells, but steady moisture means bigger yields. I set a repeating reminder to feed nitrogen every six weeks and to deep‑water about every 10 days, adjusting for rain and heat waves.
- Moist, not soggy: Deep, infrequent waterings encourage resilient roots. Understanding root response to moisture is just as important with ornamentals, as seen when growing foxtail fern in pots.
- Stay flexible: Sandy soil, wind, or heat may require added water between your regular schedule.
Troubleshooting Pests, Weeds, And Weather
Keep Birds Off The Seed Heads
Birds love ripening heads and can undo weeks of progress fast. I’ve had the best luck combining a few deterrents at once.
- Physical barriers: Drape lightweight netting or cover individual heads with mesh bags.
- Visual deterrents: Reflective tape, pinwheels, or fluttering flags disrupt feeding patterns.
- Timing trick: Harvest promptly at maturity to limit how long heads are exposed.
Spot And Stop Aphids And Sorghum Midge
Aphids cluster on stems and leaves, leaving sticky honeydew. Sorghum midge damage shows up as poor seed set in the heads.
- Early detection: Check undersides of leaves and developing panicles weekly.
- Low‑impact controls: Knock aphids off with a firm water blast; encourage beneficials like lady beetles.
- Targeted action: Use insecticidal soap or other labeled controls if populations build; follow edible‑crop labels strictly.
Drought‑Tolerant Doesn’t Mean Dry
Sorghum survives drought better than many crops, but you’ll harvest more when the soil stays evenly moist. Protect your investment by watering deeply on a schedule, then adjusting to weather.
- Mulch boost: Once established, mulch to reduce evaporation and suppress weeds.
- Heat waves: Increase frequency temporarily during extreme heat to prevent stress.
Common Mistakes To Avoid
- Planting too early: Cold soils slow germination and stunt young plants.
- Underfeeding nitrogen: Leaves pale and growth lags without regular feeding.
- Letting weeds win: Early weeds rob moisture and nutrients.
- Ignoring birds: Unprotected heads can be stripped just before harvest.
Harvest, Cure, And Store Your Crop

Harvesting For Syrup
For syrup, you’ll harvest while the seeds are still soft, right before full maturity. This timing preserves the sugars you’ll press from the canes.
- Cut seed heads first: Save them to replant next season.
- Strip the leaves: Remove leaves to avoid the bitter taste of their sap.
- Cut the cane: Take the stalk just above the lowest node, then press to extract sap.
- Settle and boil: Let the liquid rest so starches settle; draw off the clear top and boil it down into syrup.
Harvesting For Grain
For grain, wait for seeds to turn hard and glossy. Do the thumbnail test—mature grain shouldn’t dent.
- Cut heads: Clip mature heads and place them somewhere warm to dry for about a week.
- Finish clean‑up: Once dry, thresh and winnow to separate grain from chaff.
- Optional rolling: Roll grain before storage or cooking if you prefer a different texture or faster cooking time.
Drying, Rolling, And Storing
Dry grain completely, then store in airtight containers in a cool, dark spot. Properly dried and sealed sorghum keeps quality for the long haul.
- Cool and dark: Pantry, cold room, or cellar conditions are ideal.
- Long‑term potential: With good drying and storage, sorghum can remain usable for up to 10 years.
Save Seeds And Craft Uses
Keep a portion of your best heads for next year, then get creative with the rest. The plant’s versatility extends well beyond the kitchen.
- Seed storage: For longevity, store heads or cleaned seed in your refrigerator, freezer, or basement.
- Crafting value: Dried heads make classic broomcorn brooms and bring beautiful texture to dried arrangements.
Quick Reference, Checklist, And Next Steps
Sorghum At‑A‑Glance Table
| Topic | What To Do |
|---|---|
| USDA Zones | Suitable in Zones 2–11; heat improves yields |
| Ideal Heat | Best performance where summers stay around 80–90°F |
| Sunlight | 12–14 hours of direct sun in the growing season |
| Sowing Window | May–June, after frost and once soils are warm |
| Depth & Spacing | 1 inch deep, 6 inches apart |
| Soil & Fertility | Well‑drained soil with a nitrogen‑heavy fertilizer before planting |
| Feeding Schedule | Re‑apply nitrogen every six weeks |
| Watering Rhythm | Deep water every ~10 days, more often in heat or sand |
| Plant Height | Typically 2–5 feet depending on variety and conditions |
| Harvest For Syrup | Cut canes when seeds are still soft; press, settle starches, and boil |
| Harvest For Grain | Heads hard and glossy, pass the thumbnail dent test; dry ~1 week |
| Storage | Cool, dark, airtight; potential shelf life of up to 10 years |
| Pests To Watch | Birds, aphids, sorghum midge |
Garden‑Day Checklist
- Seeds ready: Have your chosen grain or sweet sorghum on hand.
- Site prepped: Full‑sun bed cleared of weeds, good drainage confirmed.
- Fertility set: Nitrogen‑forward amendment mixed in before sowing.
- Sow right: 1 inch deep, 6 inches apart; water in thoroughly.
- Weekly scan: Look for early weeds and pest signs.
- Moisture plan: Deep water about every 10 days; adjust to weather.
- Feed on time: Re‑apply nitrogen every six weeks.
- Protect heads: Netting or visual deterrents ready for birds.
- Harvest path: Decide early—syrup (soft seed) or grain (hard seed).
- Storage gear: Airtight containers labeled and a cool, dark spot reserved.
Keep The Smart Gardener Mindset
I’ve learned that great sorghum isn’t about perfection—it’s about matching a warm sowing window, generous sun, steady nitrogen, and consistent moisture. Stay observant, adjust to the weather, and let your harvest goals guide your timing. Do that, and sorghum becomes one of the most rewarding, low‑stress crops you can grow.
Join The Conversation
Have a question about your sorghum crop or a tip that worked in your climate? Share it with the community in the comments! For more practical, step‑by‑step plant care guides, visit Plant Care Dairy and let us know what you’d like to see next.
Disclaimer: This article is for informational purposes only. Always consider your local climate, soil conditions, and follow product labels and regional guidance (such as your local extension service) when applying fertilizers, pest controls, or food‑safety practices.