
If you’re looking to add a splash of color to your garden this autumn, asters are the perfect choice. These stunning, hardy flowers bloom just when you need them most—when the chill sets in and most gardens start to fade. But what if you don’t have a big garden? No problem! Growing asters in pots is not only possible but also easy, and it gives you the flexibility to move your plants around for the best light.
In this guide, I’m going to walk you through everything you need to know about planting and caring for asters in containers. I’ve seen so many gardeners make the mistake of choosing the wrong pot size or struggling with watering schedules. Trust me, a little knowledge goes a long way, and I’m here to make sure your asters thrive in pots, all the way through autumn. Ready to dive in and create a gorgeous fall display? Let’s get started.
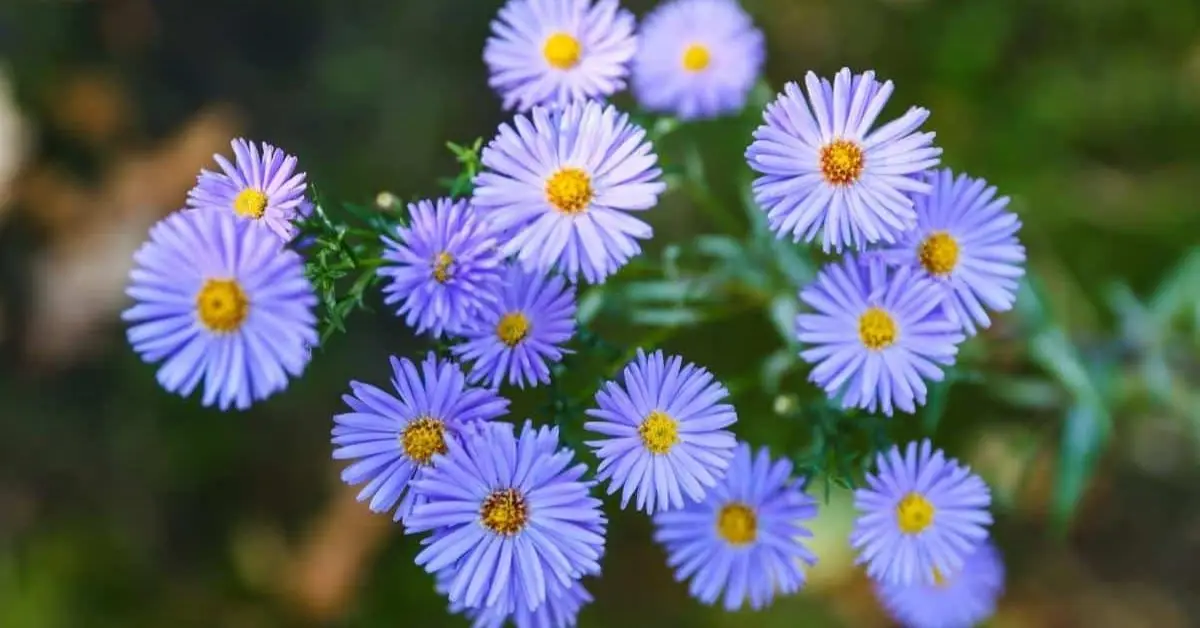
Selecting the Right Aster Variety for Pots
When it comes to choosing the right type of aster for pots, the options can be a bit overwhelming. There are so many varieties out there, and not all of them thrive in containers. But don’t worry—I’ve got you covered with the best options that will not only fit your pot but also bloom beautifully throughout the fall.
Best Aster Varieties for Container Growth
Asters are known for their stunning blooms, but to get the best out of them in pots, you’ll want to select the right variety. Here are my top picks:
- New England Asters (Symphyotrichum novae-angliae): These are great for pots because they’re tall and sturdy. Their vibrant purple, pink, and white flowers really pop against autumn’s golden hues. They thrive in containers with deep, rich soil.
- New York Asters (Symphyotrichum novi-belgii): Smaller than New England asters, these are perfect for more compact pots. Their flowers come in a variety of colors, from blue to purple, making them versatile for different garden themes.
- Alpine Asters (Aster alpinus): If you’re short on space, these smaller asters work beautifully in pots. Their compact size makes them ideal for window boxes or smaller containers, and they offer bright, cheerful colors like pink and purple.
Choosing the right variety helps ensure that your asters will not only fit well in the pot but will also grow strong and vibrant. By selecting a variety suited to container life, you’re setting your plants up for success.
Choosing the Right Size of Pots for Asters

If you’re a beginner, one of the trickiest things to figure out is the right pot size for your asters. You don’t want to choose a pot that’s too small and limits root growth, but you also don’t want one that’s too big, as it might result in the plant getting too much water and not enough nutrients. Here’s what you need to know:
- Pot Size for Small Varieties: For compact varieties like Alpine asters, a 10-12 inch pot is perfect. It provides enough space for the roots to spread while keeping it manageable in size.
- Pot Size for Larger Varieties: If you’re going for a New England aster, which tends to be taller and has a bigger root system, go for a larger pot—about 14-16 inches in diameter. This gives the roots plenty of room to grow deep and support the plant’s height.
- Depth vs. Width: Remember, asters need a pot that’s deeper than wide. A deeper pot allows the roots to stretch down, which encourages healthier growth. Make sure the pot is at least 12 inches deep for most varieties.
The right pot size can make or break your aster’s growth. Too small, and the roots will be restricted; too large, and it may lead to water retention issues. The key is balance, and selecting the perfect size ensures your aster will thrive.
Preparing Your Pot and Soil for Asters
Now that you’ve got the right variety and pot size, let’s talk about preparing the perfect environment for your asters. The soil and potting mix are just as important as the plant variety and pot size when it comes to container gardening.
Choosing the Right Potting Mix for Asters
Asters are not too picky about soil, but they do best in a well-draining, slightly acidic mix. Here’s what I recommend:
- Peat-based potting mix: This is a great base because it holds moisture but doesn’t become waterlogged.
- Add compost or organic matter: Mixing in compost helps improve the soil’s structure, adding nutrients that asters love.
- Perlite or sand: If your potting mix is too dense, add perlite or sand to improve drainage. This helps avoid waterlogging, which is a common problem in containers.
Importance of Drainage for Healthy Aster Growth
One of the most common mistakes gardeners make with container asters is poor drainage. If your pot doesn’t have enough holes at the bottom, water can collect and rot the roots—something asters definitely don’t like. Here’s how to ensure proper drainage:
- Choose pots with drainage holes: Make sure your pot has at least one drainage hole at the bottom. This will allow excess water to escape, preventing root rot.
- Add a layer of gravel: Before adding soil, place a layer of small gravel or broken clay pots at the bottom of your container. This will help water drain out more efficiently.
- Don’t let the pot sit in water: After watering, make sure the pot is not sitting in a saucer full of water. Always allow the water to drain away completely.
Healthy soil and proper drainage are critical for asters to grow strong and vibrant. Poor drainage leads to waterlogged roots, which can cause fungal diseases or root rot. By preparing your pot and soil correctly, you’re ensuring your asters have the best possible start.
If you want a deeper dive into soil preparation and container gardening tips, check out this guide from The Spruce.
Planting Asters in Pots

Planting asters in pots is easier than you might think! Whether you’re a seasoned gardener or a beginner, following a step-by-step guide will help you set your asters up for success. Let’s break it down into simple steps so you can plant your asters like a pro.
Step-by-Step Planting Guide
- Prepare Your Pot and Soil Mix: Before you even think about planting, make sure your pot is ready with the right soil mix. As mentioned earlier, a well-draining, slightly acidic mix is essential. Once your pot is filled with the prepared mix, you’re ready to move on!
- Remove the Aster from Its Nursery Pot: Gently take the aster plant out of its nursery pot. Be careful not to damage the roots while doing this. If the plant is root-bound (with roots circling the pot), gently loosen them with your fingers. This helps encourage the roots to spread out once planted in the container.
- Place the Aster in the New Pot: Set the aster in the center of the new pot, ensuring that the root ball is level with or slightly below the rim of the pot. This helps with water retention and prevents water from spilling over the sides. Make sure it’s straight and positioned the way you want it before adding any soil.
- Fill Around the Aster with Soil: Add soil around the root ball, gently pressing it down as you go to remove any air pockets. Make sure the plant is secure and won’t move around too much. Leave about an inch of space between the soil level and the top of the pot to allow for watering.
- Water Thoroughly: Once the aster is planted, water it well. This helps settle the soil around the roots and gives your plant a good start. Water until it runs out of the drainage holes, but make sure not to overwater.
- Mulch (Optional): If you like, you can add a thin layer of mulch to the top of the soil to retain moisture and keep the roots cool. Be careful not to pile the mulch directly against the stem of the plant.
This step-by-step guide makes the planting process simple and foolproof. By following these steps, you’ll set your asters up for strong root development and healthy growth. Beginners often skip small details, but this guide ensures nothing is missed.
Planting Depth and Spacing Considerations
While planting asters in pots, one of the most common mistakes I see is improper planting depth or spacing. Here’s how you can avoid that:
- Planting Depth: Asters should be planted so that the top of their root ball is level with the soil surface or slightly below. Planting them too deep can suffocate the roots, while planting them too shallow might expose the roots to drying out.
- Spacing Between Plants: If you’re planting multiple asters in the same pot, make sure to leave enough space between them. For larger varieties, leave at least 8-12 inches between each plant. This gives them room to grow without crowding, which is crucial for airflow and overall plant health.
Getting the planting depth and spacing right is key to helping your asters thrive. If they’re planted too deep, they can suffer from waterlogged roots. On the other hand, too little space can lead to competition for nutrients and air, stunting their growth.
For more detailed planting advice and tips, check out this Epic Gardening article on growing asters in containers here.
Watering and Fertilizing Asters in Pots
How Much Water Do Asters Need in Pots?
Watering asters in pots can be tricky, especially since container plants tend to dry out faster than those planted in the ground. You don’t want to overwater them, but you also don’t want them to dry out completely. Here’s how you can strike the right balance:
- Water Thoroughly, but Not Too Frequently: Asters generally need watering when the top inch of the soil feels dry to the touch. When you water, make sure you soak the soil thoroughly, so that the water reaches the root system. It’s better to water deeply less often than to give them small sips of water every day.
- Indoor vs. Outdoor Aster Watering:
- Outdoor: Asters growing outdoors in pots might need more frequent watering, especially on hot, dry days. Containers can heat up quickly, causing the soil to dry out faster.
- Indoor: If you’re growing asters indoors, the watering needs may be a bit less frequent since the soil tends to retain moisture better inside. However, indoor pots can also be more susceptible to root rot, so it’s crucial not to let the soil stay too wet.
- Signs of Overwatering or Underwatering:
- Underwatered asters will show drooping leaves and a dry, cracked surface around the soil.
- Overwatered asters will have yellowing leaves and a soggy, waterlogged soil surface.
Watering is one of the most critical factors for asters’ health. By knowing how much and how often to water, you can avoid both underwatering and overwatering, which are common mistakes that lead to unhealthy plants.
Best Fertilizers for Asters and When to Apply Them

Asters need a little extra help when it comes to nutrition, especially when they’re in pots. Since they can’t pull nutrients from the surrounding ground like plants in the garden, it’s essential to provide them with the right fertilizer.
- Best Fertilizers:
- Slow-Release Granular Fertilizer: This type of fertilizer works great for asters. It feeds the plant over time, providing a steady supply of nutrients. Look for a balanced mix, such as 10-10-10 (nitrogen-phosphorus-potassium).
- Liquid Fertilizer: For faster results, liquid fertilizers (like fish emulsion or seaweed extract) can be applied every 2-3 weeks during the growing season. They’re great for boosting the plant’s overall health and bloom production.
- Organic Fertilizers: Organic options, such as compost or worm castings, are great for asters, as they improve soil health and provide a slow, steady nutrient supply.
- When to Apply Fertilizer:
- Spring and Early Summer: Start fertilizing in early spring when you first plant your asters, and continue through the summer to support growth and blooming.
- Stop Fertilizing by Late Summer: Once fall arrives, stop fertilizing. This helps your asters harden off and prepare for the cooler temperatures.
Proper fertilization supports healthy root development and encourages more flowers. This section fills in a gap that many other guides miss—how to nourish asters properly during their growth cycle. If you’ve been using random fertilizers or not fertilizing at all, this will help your plants grow stronger and more vibrant.
For more detailed information on fertilizers and how to apply them to your container plants, check out this Love the Garden guide on growing and caring for asters.
Managing Light and Temperature for Vibrant Fall Blooms
Where Should You Place Your Aster Pots for Optimal Sunlight?
Asters thrive in full sun, so getting their light needs right is crucial for vibrant autumn blooms. But just where should you place your pots for the best results?
- Outdoor Aster Placement: For outdoor pots, make sure your asters get at least 6 hours of direct sunlight each day. A sunny patio, balcony, or garden bed that gets full sun is perfect.
- Indoor Aster Placement: If you’re growing asters indoors, place them near a south-facing window, where they’ll get the most light. If natural light is limited, consider using a grow light to supplement the sunlight.
- Avoiding Too Much Shade: While asters tolerate some light shade, they won’t bloom as well if they don’t get enough sunlight. Keep them away from areas that are too shaded, such as under large trees or in dark corners of your home.
Proper light is a key factor for healthy asters, and placing them in the right spot ensures they’ll bloom beautifully come fall. Misplacing them in too much shade or indirect light will result in weak, sparse flowers. By getting the light right, you’re giving your asters the best possible environment for flourishing.
Temperature Considerations for Fall Aster Blooms
Autumn is the ideal time for asters to bloom, but fall temperatures can be tricky. Here’s how to make sure your asters stay vibrant and healthy through the changing season:
- Ideal Temperature Range: Asters thrive in cooler temperatures, ideally between 50-65°F (10-18°C). These temperatures encourage the plants to produce more blooms.
- Protecting From Frost: While asters are hardy, an unexpected frost can damage them. If temperatures drop below 32°F (0°C), cover your pots with a frost cloth or move them indoors during cold snaps.
- Maintaining Consistent Temperature: Try to avoid sudden temperature changes, as they can stress the plant. Asters are more sensitive to extreme heat or cold, so placing them in a sheltered area that avoids harsh winds or sudden cold spells is important.
The right temperature is crucial for maximizing your asters’ bloom time. This section ensures that you’re managing the temperature properly so that your asters produce vibrant, long-lasting blooms through the fall. Without this knowledge, you might miss out on the beautiful blooms that come with the cooler autumn weather.
Dealing with Common Aster Problems
Pest Control for Asters in Pots
If you’re growing asters in pots, you might encounter a few common pests. While they’re not overly prone to pests, container-grown plants are more susceptible since they can’t move to escape trouble. Here’s how you can protect your asters and keep them healthy:
- Aphids: These tiny, sap-sucking insects can be a real headache. They often appear in clusters on the undersides of leaves. To get rid of them, spray the affected areas with a strong stream of water or use insecticidal soap.
- Spider Mites: These tiny pests are especially problematic in dry conditions. If you notice yellowing or speckled leaves, you might have a mite infestation. Try using neem oil or a mild insecticidal soap to control them.
- Slugs and Snails: These pests love to munch on aster leaves, especially during the night. Set up slug traps or place crushed eggshells around your pots to deter them.
You might also want to read about how to protect your garden from strong winds, as strong winds can often worsen pest problems by disturbing your plants and making them more susceptible to pests. For tips on how to shield your plants from strong winds, check out this helpful guide.
Pest problems are one of the easiest ways to damage a healthy plant. By addressing pests early, you can keep your asters thriving and avoid infestations that could harm their growth.
Preventing Diseases in Container Asters
Asters in pots are susceptible to a few diseases, particularly fungal infections and root rot. But with the right care, you can prevent these problems before they take root:
- Root Rot: This is a common issue when pots don’t have enough drainage. Overwatering can cause the roots to sit in water, leading to rot. Make sure your pots have proper drainage holes and always allow the soil to dry out between waterings.
- Powdery Mildew: If your asters’ leaves are covered with a white, powdery coating, they might have powdery mildew. To prevent this, ensure good airflow around your plants and avoid watering from above. If mildew appears, remove infected leaves and treat the plant with a fungicide.
- Gray Mold: Often seen in damp, cool conditions, gray mold can rot your asters’ stems and flowers. Prevent it by avoiding overcrowding in pots and making sure your asters have enough space for air circulation.
Maintaining a clean environment around your asters will help reduce disease risk. For example, weeds in your pots can create damp conditions, which are perfect for mold and rot. You can read more about how to kill weeds with salt without harming your plants to keep your pots tidy and disease-free.
Disease prevention is often overlooked, but it’s key to maintaining healthy asters. Catching fungal infections or root rot early can save your plants and keep them thriving throughout the season.
Transitioning Asters Indoors for Winter Care (Optional)
How to Transition Asters Indoors During Fall and Winter
As the weather cools down and fall sets in, you might want to keep your asters blooming indoors. While asters are hardy, they can benefit from being moved inside during winter, especially if temperatures dip too low. Here’s how to make the transition:
- Bring Them Indoors Before Frost Hits: Once nighttime temperatures drop below 32°F (0°C), it’s time to bring your asters inside. If you wait too long, frost can damage them beyond repair.
- Choose the Right Spot: Place your asters in a cool, bright area of your home, like near a south-facing window. They still need a good amount of sunlight to keep blooming, but you should avoid placing them near radiators or heaters, as they prefer cooler temperatures.
- Watering Indoors: Indoor asters typically need less frequent watering than their outdoor counterparts. Be sure to let the soil dry out a bit before watering again to prevent root rot.
As you prepare to move your asters indoors, why not take the opportunity to propagate thyme at home? This is a great way to fill your indoor space with fresh herbs while your asters get ready for the colder months. For a step-by-step guide, check out this article on how to propagate thyme at home.
By moving your asters indoors, you extend their lifespan and ensure they stay healthy through the winter months. This section gives your readers the know-how to keep their asters thriving even as the seasons change.
Conclusion
Recap of Key Steps for Vibrant Autumn Asters in Pots
In this guide, we’ve covered everything you need to grow and care for asters in pots. To recap:
- Selecting the Right Variety: Choose asters suited to container life and the size of your pot.
- Proper Potting and Soil Preparation: Ensure good drainage and the right mix of soil for healthy roots.
- Watering and Fertilizing: Water thoroughly but not too frequently, and use the right fertilizers to keep your asters strong.
- Light and Temperature: Make sure your asters get enough sunlight and are protected from extreme temperatures.
- Pest and Disease Control: Be proactive in managing pests and preventing diseases like powdery mildew and root rot.
- Winter Care: If you’re in a colder climate, transition your asters indoors to keep them blooming throughout the winter.
With these steps, your asters will not only survive but thrive, giving you vibrant blooms that last all through the fall and beyond. Remember, proper care leads to beautiful, healthy plants, and with these tips, you’re well on your way to becoming a confident aster gardener.
Have you ever grown asters in pots? Share your tips or ask any questions in the comments below! I’d love to hear about your gardening experiences. And don’t forget to check out more expert plant care tips on Plant Care Dairy — your go-to resource for everything plant care-related!
Disclaimer: The information provided in this article is based on personal experience and general gardening practices. While every effort is made to ensure accuracy, results may vary depending on local conditions, plant variety, and care methods. Always consult with a professional for specific advice tailored to your needs.