Winter can be brutal on container plants, and potted hydrangeas are no exception. My goal here is simple: cut through the mixed advice and give you clear, actionable steps that keep your shrub’s roots safe, prevent overwatering, and position your plant for a strong spring comeback.
By the end of this guide, you’ll know exactly where to place your pots, how to insulate them, when and how much to water in the cold, and which hydrangea types truly need extra protection. I’ll also share a checklist you can screenshot, a quick-reference table, and the nine precise steps I follow every winter.
Quick personal note: I once lost a gorgeous bigleaf hydrangea because I assumed it could “tough it out” on the deck. I didn’t wrap the container, I watered it like it was June, and a wild freeze-thaw cycle did the rest. Since then, I’ve winterized my pots the right way—and the difference has been night and day.
Why Winterizing Potted Hydrangeas Matters
Pots Expose Roots To Cold
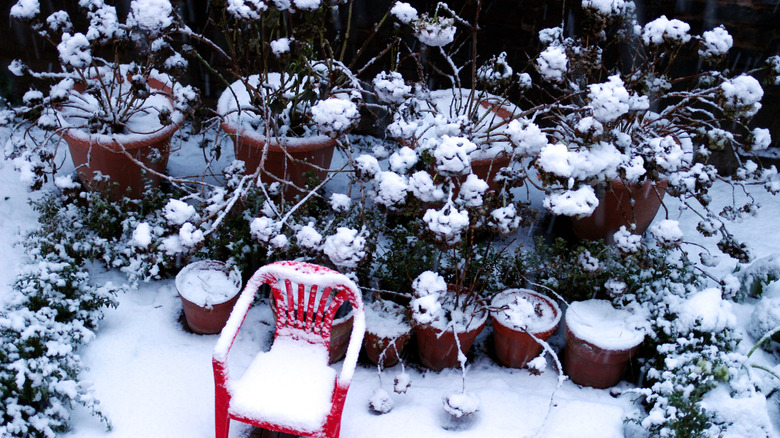
Unlike shrubs planted in the ground, containers don’t have the earth’s natural insulation. The pot walls transmit cold straight to the root ball, and that exposure can be severe when temperatures plunge and bounce back.
- Direct exposure: Containers on open patios, decks, or balconies catch wind and cold from all sides.
- Freeze-thaw stress: Sudden swings in temperature are more damaging than steady cold because expanding and contracting ice crystals injure roots and tissues.
- Decorative pots = minimal insulation: Many beautiful planters are thin-walled and offer little thermal buffering.
Dormancy Changes What Plants Need
Hydrangeas slow way down in winter. They are not pushing out new leaves or blooms; they’re conserving energy. That means your job shifts from “grow” mode to “protect and maintain.”
- Less water needed: Cold temperatures reduce uptake; watering like it’s summer risks root rot.
- Protect buds and stems: Tender buds for next year’s flowers need shielding from extreme cold and drying winds.
- Gentle handling: Avoid heavy pruning in winter; focus on safeguarding the structure and root zone.
Which Hydrangeas Need Protection Most
All container hydrangeas benefit from some winter prep, but a few need it more than others. Here’s the quick hierarchy I’ve learned to trust.
- Always protect: Bigleaf (Hydrangea macrophylla) and mountain (H. serrata) hydrangeas. Their flower buds are more cold-sensitive.
- Sometimes protect: Oakleaf (H. quercifolia) and climbing (H. anomala subsp. petiolaris). Protection depends on your zone and exposure.
- Rarely protect: Smooth (H. arborescens) and panicle (H. paniculata). They’re hardier but still appreciate root insulation in containers.
Choose The Best Winter Spot For Your Pots
Shield From Wind And Temperature Swings
I always start by rethinking location. Even a move of a few yards can make a difference when it means less wind and fewer temperature jolts.
- Pick a sheltered corner: A porch nook, a patio corner, or a spot against a south- or east-facing wall reduces wind and radiates a touch of warmth.
- Get pots off open rails: Elevated, wind-whipped placements chill the root zone faster.
- Cluster containers: Grouping pots creates a buffer and helps each plant share a bit of warmth.
Indoors-But-Unheated Options
“Indoors” doesn’t have to mean warm. In fact, unheated spaces are perfect for keeping plants cold and dormant without exposing them to brutal wind.
- Unheated garage or shed: Great for shielding roots; just ensure occasional light and check moisture monthly.
- Cold greenhouse: Offers light with stable cold; ventilation matters to prevent mold.
- Breezeway or mudroom: If unheated, these can be excellent holding spaces for small or medium pots.
When You Can Leave Pots Outdoors
Some gardeners prefer to keep everything outside, and that can work with the right tweaks. Your microclimate, container size, and hydrangea type guide the decision. For additional practical tips from other gardeners, see this discussion on overwintering potted hydrangeas in cold zones.
- Large containers win: Bigger soil volumes buffer temperature swings better than small pots.
- North winds are the enemy: If you must stay outdoors, use windbreaks or walls for protection.
- Snow can help: A natural snow cover acts like an insulating blanket around the pot and soil surface.
Wrap Potted Hydrangeas And Reduce Winter Watering
How To Insulate Containers (Burlap, Bubble Wrap, Mulch)
Container insulation is the single most impactful change I made. It’s fast, inexpensive, and incredibly effective for root protection.
- Wrap the pot, not the soil surface: Use burlap or bubble wrap around the container walls to slow heat loss. Secure with twine or tape. Learn more in our guide on wrapping container plants in burlap for winter.
- Mulch the soil: Add 2–4 inches of shredded leaves, straw, or bark over the soil to buffer temperature and evaporation.
- Lift the pot: Set containers on pot feet or bricks to prevent waterlogging and reduce freeze bonding to the ground. Also, avoid harmful winter deicing salts; see plant-safe winter deicing tips.
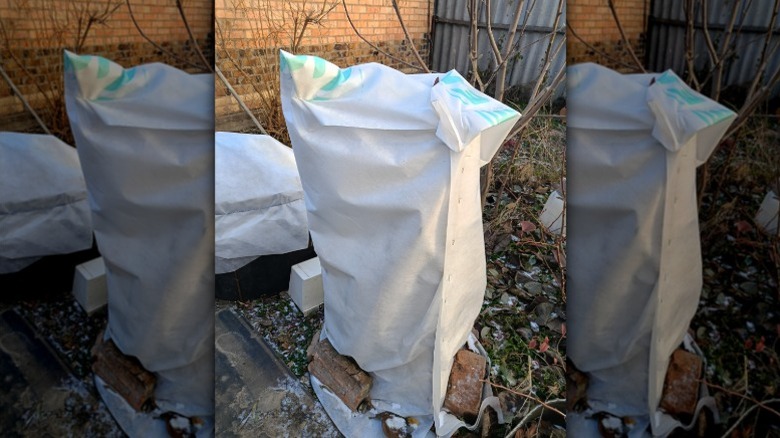
When To Wrap The Whole Plant
In the coldest climates, or when temperatures swing wildly, you may need to wrap more than just the pot. This is especially true for bigleaf and mountain hydrangeas. For step-by-step guidance, see Melinda Myers’ tips for overwintering potted hydrangeas.
- Build a loose frame: Use stakes and burlap to create a breathable windbreak around the shrub.
- Don’t create a sauna: Avoid air-tight plastic. Hydrangeas need airflow to prevent mold.
- Watch the buds: Keep the wrap loose so buds aren’t crushed; the goal is wind and ice protection, not compression.
A Safer Cold-Season Watering Routine
Cold slows water uptake dramatically. Your plant will drink slowly in winter, so your routine should be minimal and careful. For tips on protecting other container plants in winter, see how to prevent winter stress on jade plants.
- Check, then water lightly: If the top few inches feel dry by touch, give only 1/2 to 1 cup of water.
- Try the toothpick test: Stick a plain wooden toothpick in the soil. If it darkens, there’s moisture—skip watering.
- Spacing intervals: In dry climates, watering every 2–4 weeks often suffices. If natural snow keeps the soil lightly moist, you may skip watering altogether.
For more step-by-step advice on winter watering, check Martha Stewart’s overwintering guide for hydrangeas.
The 9 Smart Steps To Overwinter Potted Hydrangeas
The Step-By-Step Plan
- Choose A Sheltered Spot: Move pots out of direct wind and away from rails or exposed decks. Corner porches, near walls, or unheated garages are ideal.
- Elevate The Container: Use pot feet or bricks to improve drainage and reduce freeze bonding to surfaces.
- Wrap The Pot Walls: Insulate with burlap or bubble wrap, securing firmly but leaving drainage holes open.
- Mulch The Soil Surface: Add 2–4 inches of leaves, straw, or bark to buffer roots and slow evaporation.
- Consider A Plant Wrap In Harsh Zones: For bigleaf and mountain hydrangeas, create a breathable burlap frame if deep cold or wind is expected.
- Reduce Watering Volume: Only water when the soil is dry to the touch; give 1/2–1 cup at a time.
- Use The Toothpick Test: Insert a wooden toothpick; if it changes color, there’s enough moisture—wait before watering.
- Monitor After Weather Swings: Check the soil after thaws and cold snaps; adjust watering or insulation as needed.
- Stay Patient With Dormancy: No new leaves or blooms in winter is normal—focus on protection, not growth.
Common Mistakes To Avoid
- Watering like it’s summer: Overwatering is the fastest route to root stress in cold soil.
- Leaving decorative pots bare: Thin walls leak heat; simple wraps make a huge difference.
- Using airtight plastic: Trapped moisture invites mold; aim for breathable protection.
- Ignoring wind exposure: Wind dries buds and can snap stems; move to a protected area.
- Heavy pruning in winter: Save major cuts for late winter or early spring according to your hydrangea type.
My Minimalist Winter Toolkit
- Burlap and twine: For breathable wraps and simple windbreaks.
- Bubble wrap: Efficient pot insulation—use around containers, not over foliage.
- Mulch material: Shredded leaves, straw, or bark for a 2–4 inch layer.
- Wooden toothpicks: Reliable, eco-friendly moisture gauge for quick checks.
- Pot feet or bricks: To elevate containers and keep drainage clear.
Troubleshooting And Adjustments
Signs Your Hydrangea Is Too Cold
Not all cold damage is obvious at first. I look for subtle cues and act before a deep freeze returns.
- Wilted or water-soaked buds: Indicates freeze injury; add more insulation and wind protection.
- Bark splits near the base: A freeze-thaw warning sign; consider a heavier wrap and a more stable location.
- Soil frozen solid for days: Move to a more protected spot and increase mulch around the crown.
Signs Of Overwatering Or Root Stress
Too much water in cold soil can be just as harmful as deep frost. The fix is almost always “less water, more patience.”
- Mushy stems or a sour smell: Classic rot signals—let the soil dry and reduce volume next time.
- Yellowing without new growth: In winter dormancy, this often points to excess moisture rather than nutrient issues.
- Standing water under the pot: Elevate the container and ensure drainage holes are clear.
Timing The Spring Wake-Up
Spring isn’t a switch; it’s a gradual handoff. I ease my hydrangeas back into the growing season to avoid shock.
- Unwrap in stages: Remove windbreaks and extra insulation after the last hard freeze, watching overnight lows.
- Increase water slowly: As days warm and the plant shows swelling buds, move from sips to a deeper drink.
- Resume feeding later: Wait for active growth before fertilizing; dormant roots won’t use it.
Wrap-Up And Smart-Gardener Mindset
Quick Reference Table
| Hydrangea Type | Protection Need In Containers | Winter Watering Guide | Notes |
|---|---|---|---|
| Bigleaf (H. macrophylla) | High: Wrap pot + consider plant wrap | 1/2–1 cup only when top few inches are dry | Very sensitive buds; avoid wind |
| Mountain (H. serrata) | High: As for bigleaf | 1/2–1 cup every 2–4 weeks if dry | Stable temps matter |
| Oakleaf (H. quercifolia) | Moderate: Wrap pot; plant wrap in harsh zones | Minimal—follow touch/toothpick test | Protect from north winds |
| Climbing (H. anomala) | Moderate: Wind shelter helps | Sips only when dry | Support stems; avoid heavy snow load |
| Smooth (H. arborescens) | Low–Moderate: Pot wrap recommended | Check monthly; water lightly if dry | Hardy but container roots still chill |
| Panicle (H. paniculata) | Low–Moderate: Pot wrap optional | Often no water if snow cover persists | Reliable, but don’t skip drainage |
Actionable Checklist You Can Screenshot
- 1. Pick the spot: Sheltered corner, unheated garage, or cold greenhouse.
- 2. Elevate the pot: Use feet or bricks for drainage and frost protection.
- 3. Wrap container walls: Burlap or bubble wrap—breathable and secure.
- 4. Mulch the soil: 2–4 inches of leaves, straw, or bark.
- 5. Consider a plant wrap: For bigleaf/mountain in harsh conditions.
- 6. Water sparingly: Only when dry; 1/2–1 cup at a time.
- 7. Toothpick check: Darkened toothpick = moisture present; skip watering.
- 8. Inspect after cold snaps: Adjust insulation; keep wind off buds.
- 9. Be patient with dormancy: No leaves or blooms now is normal; protect, don’t push.
Final Notes, CTA, And Disclaimer
Protecting potted hydrangeas in winter isn’t complicated—it’s thoughtful. Focus on root insulation, wind shielding, and watering less, and you’ll set your shrub up for lush foliage and blooms when warmth returns.
If you found this helpful, I’d love to hear your winter routine and what’s worked in your zone. Drop a comment on Plant Care Dairy and let’s compare notes. Your tip might become someone else’s winter lifesaver.
Disclaimer: This article is for general educational purposes and reflects personal gardening experience. Always consider your USDA hardiness zone, microclimate, and specific hydrangea type before applying care advice. Use breathable materials for wraps, ensure containers have proper drainage, and adjust watering to actual soil moisture, not the calendar. Proceed at your own discretion and consult local experts for region-specific guidance.