
If you’ve ever stepped into your garden one morning and noticed orange dust coating your rose leaves, you’re not alone. The first time I saw it, I thought my plants had caught a strange kind of pollen. Within days, the leaves started curling and dropping — that’s when I learned the hard way about rose rust.
Rose rust is one of those sneaky fungal diseases that looks harmless at first but can quietly strip a healthy rose bush bare in a single season. It doesn’t matter whether you’re growing delicate hybrid teas in England, climbing roses in California, or sturdy shrubs in Asia — once those orange pustules appear, every gardener feels the same mix of frustration and guilt: “Did I do something wrong?”
The good news? You can stop it. Whether you prefer natural, eco-friendly methods or targeted chemical control, rose rust can be managed — and even prevented — with a bit of observation, timing, and smart care.
In this guide, I’ll walk you through how to spot early signs, treat the infection, and keep your roses healthy year-round. You’ll also find simple tips I’ve tested myself, insights from plant pathologists, and what real gardeners on forums say actually works.
Before we dive in, I want you to take a quick look at your roses today. Check the underside of a few leaves. If you spot tiny orange or brownish bumps — congratulations, you just caught the problem early. And that’s half the battle won.
So, let’s talk about what’s really happening on those leaves — and how you can fix it fast.
Why You Should Care About Rose Rust

If you love roses as much as I do, you already know how much care goes into every bloom. But what many gardeners don’t realize is that rose rust isn’t just a cosmetic problem — it’s a disease that slowly drains your plant’s strength from the inside out.
Rose rust is caused by a group of fungi in the Phragmidium genus. They’re specialists — they only attack roses. Once they settle in, they feed on the plant’s tissues, robbing it of nutrients and weakening the entire structure.
Here’s what can happen if you ignore those first orange spots:
- Leaves start yellowing and curling from the edges.
- The plant loses its energy, producing fewer buds and smaller blooms.
- In severe cases, roses can defoliate completely before the season ends.
- The fungus can survive through winter on fallen leaves, waiting to strike again next year.
It’s a slow, quiet problem — and that’s why so many gardeners overlook it. In humid or coastal regions, especially, rose rust can spread faster than you expect. By the time you notice leaves dropping, the infection may have already taken over half your plant.
The good news? Once you understand how it starts and spreads, you can stop it before it ruins your garden. Let’s learn how to spot it early.
Early Signs & Symptoms: How to Recognise Rose Rust
Every successful treatment starts with accurate identification. Rose rust often hides in plain sight — and I’ve seen even experienced gardeners confuse it with black spot or mildew. If you catch it early, though, it’s easy to control without harsh chemicals.
1. What It Looks Like on Leaves, Stems & Buds
Here’s your quick visual checklist:
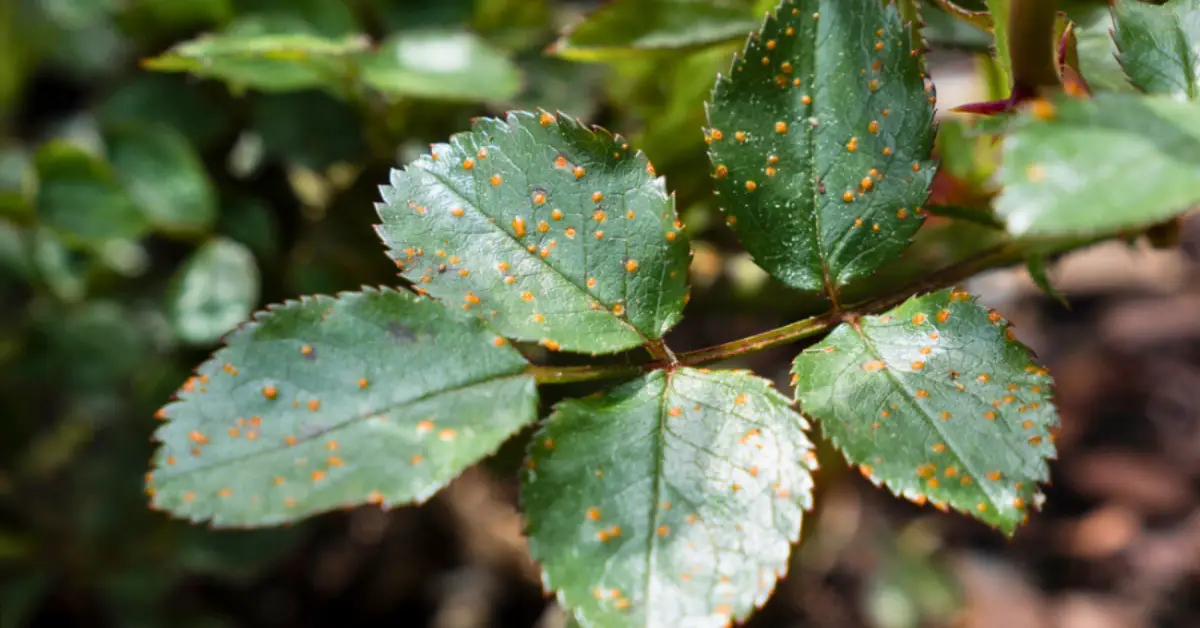
- Upper leaf surface: Pale yellow or light green spots, often mistaken for nutrient deficiency.
- Underside of leaves: Bright orange or rust-colored pustules — these are spore clusters. Rub your finger gently; you’ll see orange dust.
- Stems and buds (late stages): Dark brown or black crusty spots in autumn or early winter.
Once you’ve seen those orange specks, you’ll never forget them. That’s the fungus actively producing spores — and each speck can release thousands.
2. How to Tell It Apart from Other Common Rose Diseases
Here’s a quick comparison so you don’t mix it up with something else:
| Symptom | Rose Rust | Black Spot | Powdery Mildew | Downy Mildew |
|---|---|---|---|---|
| Color of spots | Orange/rusty, often under leaves | Black or dark purple, with yellow halo | White powdery coating | Grayish-white patches |
| Leaf texture | Rough, dusty underside | Smooth surface | Velvety coating | Soft, oily appearance |
| Season | Spring to autumn, humid weather | Warm, wet months | Dry + humid conditions | Cool, damp weather |
If your plant’s showing orange or rust-colored dust, it’s almost certainly rose rust — not black spot. If you ever notice a white, powdery film instead of orange spots, that’s a different problem altogether. I’ve explained exactly what it means and how to fix it in my guide on how to treat powdery mildew on roses.
3. When & Where Rust Tends to Show Up
- Starts on lower leaves first (closest to moist soil).
- Spreads upward as spores travel through splashing water or wind.
- Favors mild temperatures (10–25°C) and moist leaves for 2–4 hours.
- Common in gardens with dense planting, shade, or overhead watering.
If you water your roses in the evening, the leaves stay wet overnight — that’s the perfect invitation for rust to germinate. Switching to early-morning watering can make a huge difference.
What Causes Rose Rust & How to Prevent It Before It Starts
When you know how this disease behaves, prevention becomes simple and logical. Rose rust isn’t a random accident — it follows a clear cycle, and you can break it with a few mindful habits.
1. The Disease Cycle in Short
Think of rose rust as a hitchhiker that never leaves your garden unless you kick it out:
- Spores overwinter on infected leaves or canes left on the ground.
- In spring, they reactivate and infect new growth when the air is moist.
- Once established, the fungus releases new spores throughout the season.
A single infected leaf can spread spores across your entire rose bed with one windy afternoon. According to the University of Wisconsin Extension, these fungi can complete multiple life cycles in a single growing season — that’s why consistent prevention is key.
2. Smart Preventive Strategies
Here’s what works best (and what I do in my own garden):
- Ensure good airflow: Space your plants well; trim crossing branches to reduce humidity between leaves.
- Avoid overhead watering: Always water at the base, not over the leaves.
- Keep things clean: Remove and destroy fallen leaves — never compost infected ones.
- Check new plants: Inspect nursery roses before bringing them home.
- Rotate varieties: Don’t grow the same variety in the same spot year after year if rust keeps recurring.
3. A Note for Indian or Tropical Gardeners
If you’re in a region with monsoon humidity, rust pressure is naturally higher.
Here’s what helps:
- Water early in the morning so foliage dries by midday.
- Add a thin mulch layer (like dry leaves or compost) to prevent soil splash.
- Use organic neem-based sprays as preventive protection every 10–15 days during wet months.
- Choose varieties bred for heat and humidity resistance — they recover faster after infection.
4. Pre-Season Health Checklist for Roses
Before each new growing season, run through this quick checklist:
- Inspect old canes for black or crusty spots
- Remove any leftover debris from last year
- Prune for airflow and shape
- Clean your tools with alcohol or bleach solution
- Mulch around the base to prevent soil splash
- Avoid overfeeding with nitrogen — it makes soft growth that’s fungus-prone
If you follow even half of these steps, you’ll prevent most fungal issues — not just rust.
Natural & Home Remedy Options (When You Want a Chemical-Lite Approach)
When I first started growing roses, I used to panic at the sight of orange spots. Over time, I learned that most cases of rust can actually be handled without touching a single chemical bottle. The secret is consistency — not intensity.
Let’s start with the basics.
1. Sanitation & Mechanical Control (Basic but Effective)
Before you mix sprays or buy treatments, do this: clean up the infection.
Here’s what I do whenever I spot rust early:
- Remove every infected leaf or branch the moment you see it. Don’t hesitate — those leaves are spore factories.
- Never compost infected material. Instead, bag it and dispose of it safely or burn it if your local rules allow.
- Wipe or sterilise your pruning tools with alcohol after every cut.
- Clear fallen leaves around the base of the plant — that’s where rust overwinters.
- Give your roses breathing space. If leaves stay damp for hours, the fungus spreads faster.
Honestly, 70% of the battle is just smart housekeeping.
2. Botanical Sprays & Home-Made Treatments

Once you’ve cleaned up, it’s time to protect new leaves. Natural sprays can help suppress spores before they take hold.
Here are some that actually work — and are gentle on pollinators and soil life too:
- Neem oil spray: Mix 1 teaspoon of pure neem oil with 1 liter of water and a few drops of mild soap as an emulsifier. Spray both sides of the leaves once every 7–10 days during warm, humid weeks. Neem disrupts fungal growth and doubles as an insect deterrent.
- Horsetail or nettle tea: A traditional European method that strengthens plant tissue. Steep the dried plant for 24 hours, dilute 1:5 with water, and spray weekly. The silica helps harden leaves against fungal penetration.
- Baking soda mix: Combine 1 tablespoon of baking soda, 1 tablespoon of horticultural oil, and 1 liter of water. It alters the leaf’s pH so spores struggle to germinate.
Tips from experience:
- Always spray early in the morning or late afternoon when the sun isn’t harsh.
- Focus on leaf undersides, where most spores live.
- Reapply after heavy rain.
- If you have pets or kids, let the spray dry completely before letting them near the area.
According to Plantura Garden, regular organic sprays combined with pruning and air circulation can stop mild rust from spreading altogether.
3. When to Stay Natural – and When to Escalate
Natural control works best if you:
- Catch the infection early (less than 30% of leaves affected).
- Have otherwise healthy, vigorous plants.
- Can maintain a weekly spray and inspection routine.
But if your roses are losing most of their leaves, or if rust keeps coming back year after year, it’s time to step up. Chemical fungicides can rescue a plant that natural methods can’t.
You can think of it like this simple decision path:
If the infection is small → stay natural and monitor.
If more than one-third of leaves are affected or rust returns every season → move to chemical control.
Chemical Treatment Options (When Natural Isn’t Enough)
Sometimes, despite your best efforts, rust gets ahead of you. Don’t worry — chemical control doesn’t mean harming your garden ecosystem. It’s about using the right product at the right time, then letting nature take over again.
1. How Fungicides Work & When to Apply
There are two main types:
- Protectant fungicides (like chlorothalonil or mancozeb): these coat the leaf surface and block spores before they germinate.
- Systemic fungicides (like myclobutanil or propiconazole): these enter the plant tissue and fight infection from within.
Timing is everything:
- Start spraying at the first sign of orange pustules — or even earlier if your roses get rust every year.
- Reapply every 10–14 days during wet or humid spells.
- Once most leaves are already infected, fungicides can slow the disease but won’t reverse existing damage.
2. Recommended Products & Safety Notes
Below is a quick reference guide for global and Indian gardeners alike. Always read the product label for your region.
| Active Ingredient | Common Product Names (example) | Interval | Safety Notes |
|---|---|---|---|
| Sulfur | Sulfex, Safer Garden Dust | Every 7–10 days | Organic option; avoid in very hot weather. |
| Mancozeb | Dithane M-45, Indofil M-45 | Every 10 days | Broad-spectrum protectant; wear gloves and mask. |
| Myclobutanil | Systhane, Bayer Fungus Fighter | 14–21 days | Systemic; stops spore growth inside leaf. |
| Propiconazole | Tilt, Banner Maxx | 14 days | Potent systemic; avoid overuse to prevent resistance. |
Safety reminders:
- Mix only the amount you’ll use immediately.
- Wear gloves, eye protection, and a mask.
- Keep pets and children away until the spray has dried.
- Alternate between chemical groups every season to avoid fungal resistance.
3. Resistance Management & Long-Term Strategy
I’ve seen gardeners rely on one product for years, only to find it stops working. That’s resistance.
Here’s how to prevent it:
- Rotate between different fungicide types (sulfur → mancozeb → systemic).
- Always pair chemical use with good cultural habits — cleaning leaves, pruning for airflow, and avoiding night watering.
- Reduce use once the plant stabilises; return to natural prevention next season.
Treating rust isn’t about winning a one-time fight — it’s about keeping balance in your garden.
Post-Treatment Care & Long-Term Maintenance
After the rust fades, your work isn’t done. Healthy recovery takes a few smart steps.
1. Monitoring & Follow-Up Schedules
- Check leaves weekly for any new orange spots.
- Remove new infections immediately.
- Repeat protective spray (natural or chemical) every 10–14 days for at least a month after symptoms disappear.
- Once the season ends, clean up all debris before winter. For a detailed seasonal checklist that keeps your roses strong through cooler months, you can follow my complete guide on how to care for roses in autumn.
A five-minute inspection each week can save you from another full-blown outbreak.
2. Soil & Nutrient Health for Stronger Roses

A strong rose fights disease naturally.
Here’s what keeps mine thriving:
- Use a potassium-rich fertiliser (rose-specific blends work well). Potassium strengthens cell walls.
- Go easy on nitrogen — too much causes soft, juicy growth that fungi love.
- Add compost or well-rotted manure to improve soil biology.
- Keep the bed well-drained; no fungus loves a soggy base.
- Apply mulch around the roots to regulate moisture and temperature.
A healthy soil ecosystem is your best long-term fungicide.
3. Choosing Rust-Resistant Varieties (And When to Let Go)
Some roses are simply better fighters. If you’re tired of battling rust every season, consider switching to a more resistant variety.
Well-known rust-resistant types include:
- ‘Knock Out’ Series
- ‘Flower Carpet’ Roses
- ‘Home Run’ Roses
- ‘Carefree Beauty’
- ‘Sea Foam’ Climbers
(You can also ask your local nursery for varieties suited to your climate.)
And if one bush keeps getting infected no matter what you do — it’s okay to remove it. Sometimes sacrificing one plant saves ten others.
Troubleshooting Table
Here’s a quick “if you see this → do this” reference to make rust control simpler:
| Symptom | Possible Cause | What You Should Do |
|---|---|---|
| Yellowing lower leaves with orange spots underneath | Early-stage rust infection | Remove infected leaves immediately; spray neem oil or baking soda mix weekly. |
| Orange or rust-colored powder on underside of leaves | Active fungal spore stage | Start neem + horsetail spray; increase airflow and avoid evening watering. |
| Black specks on leaves/stems in autumn | Overwintering spores (teliospores) | Prune affected canes; clear debris; apply pre-season fungicide in spring. |
| Entire plant defoliated repeatedly each year | Severe chronic rust infection | Consider resistant variety or remove the plant to prevent spread. |
| Rust returns soon after treatment | Fungal resistance or incomplete sanitation | Alternate fungicide type; disinfect tools; avoid composting infected material. |
This table isn’t just a quick guide — it’s your all-season reference to keep rust under control with minimal guesswork.
Your Rose Garden’s Health Checklist
Rose rust can feel discouraging, but here’s the truth: it’s one of the most manageable rose diseases — if you act early and stay consistent.
I’ve seen tired, rust-ridden bushes bounce back into full bloom within one season just because their owners made a few small but regular changes.
Here’s your “Rose Rust Prevention & Treatment Checklist” — something you can print or pin near your potting bench:
- Inspect weekly: Flip a few leaves every weekend — early detection saves your plant.
- Remove infected leaves immediately: Never compost; bag or burn them.
- Clean pruning tools: Wipe blades with alcohol after every cut.
- Water early in the morning: Keeps foliage dry and less inviting to spores.
- Improve airflow: Prune overcrowded stems and space plants generously.
- Use preventive sprays: Neem or horsetail tea every 10–14 days in humid months.
- Apply fungicide if needed: Alternate chemical groups for resistance management.
- Feed wisely: Use potassium-rich fertiliser and avoid overdoing nitrogen.
- Clean up before winter: Remove debris, prune weak canes, and apply a final preventive spray.
- Choose resistant varieties: Replant with tougher types like Knock Out or Carefree Beauty.
This list isn’t just for now — it’s your long-term roadmap for keeping rust (and most fungal diseases) out of your garden for good.
Even if your roses are struggling right now, don’t give up. With a bit of routine care, balanced feeding, and mindful prevention, they’ll reward you with stronger stems and brighter blooms next season. And if you’ve ever paused to wonder why roses grow thorns in the first place, there’s actually a beautiful scientific reason — you can read more in my article on why roses have thorns.
I’d love to hear from you!,Have you tried any of these methods yourself — or discovered a home remedy that worked wonders?,Drop your experience or questions in the comments below — your tip might help another gardener.
Want more expert garden care guides like this? Visit Plant Care Dairy for weekly articles, real-life plant fixes, and practical gardening wisdom that actually works.
Disclaimer: The information in this article is for general gardening guidance only. Always follow local regulations and read product labels before using any chemical treatments. If you’re unsure about plant diseases or chemical use, consult a certified horticulturist or your local agricultural extension office.