
I’ve grown more than a dozen cherry tomato varieties on my balcony and in small backyard beds — and I still get a thrill the first time the vines sag under the weight of a hundred bright, sweet fruits. If you want reliably juicy cherry tomatoes without wasting time or money, this guide will walk you through exactly what to do, step by step, for both containers and garden plots.
I’ll show you which varieties actually thrive in small spaces, how to time seed-starting for your US zone, simple soil and watering rules that prevent the most common mistakes, and the exact supports and pruning that double your harvest. No fluff, no vague platitudes — just what works in real home gardens.
Read this if you want clear, doable instructions you can follow today — whether you’re starting from seed, buying transplants, or rescuing a struggling plant. Tell me where you’re planning to grow (balcony, raised bed, or a 5-gallon pot), and I’ll tailor the next steps for you.
How to Grow Cherry Tomatoes at Home – Complete Guide
I still remember the first time I tried growing cherry tomatoes at home — it started with a single pot on my apartment balcony. Within weeks, those tiny green buds turned into bright red jewels, and I realized why homegrown tomatoes taste nothing like the store-bought ones. If you’ve ever dreamed of picking fresh, sweet tomatoes right from your window or backyard, you’re in the right place.
In this complete guide, I’ll walk you through everything I’ve learned over the years — from choosing the right variety and setting up your space, to keeping your plants healthy and productive all season long. Whether you’ve got a sunny balcony or a small garden bed, growing cherry tomatoes is easier than you think when you understand how they work.
By the end of this section, you’ll know exactly:
- Why cherry tomatoes are perfect for home growers
- How they differ from the bigger tomato types you see in stores
- What varieties give you the best taste, yield, and success rate in small spaces
Let’s start with why cherry tomatoes are a home gardener’s best friend.
Why Cherry Tomatoes Are Ideal for Home Growing

Cherry tomatoes are the energetic little cousins of larger tomato varieties. They grow faster, need less space, and produce fruit more consistently throughout the season.
Here’s what sets them apart:
- Shorter maturity time: You can harvest in about 55–65 days, compared to 80+ days for larger types.
- Continuous fruiting: They keep producing clusters all season instead of one big harvest.
- Smaller root system: Perfect for containers and raised beds — no sprawling roots taking over.
- Higher sugar content: That’s why they taste so sweet straight off the vine.
If you’re short on time or space but still want maximum reward, cherry tomatoes are the smartest crop to start with. According to the University of Florida’s IFAS Gardening Solutions, even beginners can succeed with cherry varieties thanks to their strong disease resistance and adaptability to container setups.
Benefits for Home Growers (Fast Harvest, Compact Plants, High Yield)
I’ve tested several vegetables over the years, but cherry tomatoes consistently deliver the most value per square foot. Here’s why home growers love them:
- Quick returns: You’ll see flowers within a few weeks of transplanting.
- Compact size: Many varieties grow just 3–4 feet tall, making them perfect for patios, balconies, or even kitchen windows.
- Heavy producers: One healthy plant can give you hundreds of fruits per season.
- Low maintenance: They bounce back quickly from minor neglect — ideal if you forget a watering now and then.
They’re also one of the easiest ways to get kids or beginners excited about gardening — the visible progress keeps you motivated.
Common Myths & Realities
Over time, I’ve heard plenty of misconceptions about cherry tomatoes. Let’s clear a few of them up:
| Myth | Reality |
|---|---|
| “Cherry tomatoes need a lot of space.” | Most compact or determinate types thrive in 10–12-inch pots. |
| “They’re delicate and hard to maintain.” | In truth, they’re tougher than many large varieties and recover fast from stress. |
| “They don’t grow well indoors.” | With proper sunlight (6–8 hours) or a grow light, they do surprisingly well inside. |
| “They’re only for beginners.” | Even seasoned gardeners prefer them for steady yields and flavor consistency. |
The reality? Cherry tomatoes are forgiving, productive, and versatile — everything a home grower could ask for.
Choose the Right Variety for Your Space
Choosing the right variety is half the battle. Each type behaves differently, and picking one that fits your lifestyle makes all the difference.
Here’s how I decide what to plant:
- Growth habit:
- Determinate (bush type) — grows to a fixed height and fruits all at once (great for small patios).
- Indeterminate (vining type) — keeps growing and producing all season (needs staking).
- Fruit size & flavor: Smaller fruits often mean sweeter taste; larger cherries like ‘Black Cherry’ add richer flavor.
- Space available: If you have limited room, go for dwarf or patio hybrids.
- Climate & growing zone: Some handle humidity better, others love dry heat — we’ll match that next.
Think of this step like choosing the right dog breed — they’re all tomatoes, but their personalities (and needs) differ wildly.
Top Recommended Cherry Tomato Varieties for Home Gardens and Containers
Here are a few that have never failed me (and most gardeners in the US swear by them):
- ‘Sungold’: Exceptionally sweet and productive; great for snacking and salads.
- ‘Sweet Million’: Heavy yielder with consistent flavor.
- ‘Tiny Tim’: Compact bush, perfect for pots and small containers.
- ‘Black Cherry’: Deep, rich flavor with a hint of smokiness.
- ‘Juliet’: Slightly larger, ideal for roasting and drying.
If you’re growing for the first time, start with Sungold — it’s hard to go wrong with it.
How Climate and Space Affect Variety Choice
Where you live shapes what thrives.
- Hot, humid states (Florida, Texas): Choose heat-tolerant, disease-resistant types like Sweet Million or Juliet.
- Cooler zones (Pacific Northwest, Northeast): Go for early-maturing, compact ones like Tiny Tim or Sungold.
- Limited light (balconies, urban apartments): Stick to determinate or dwarf hybrids that manage with partial sun.
A good rule of thumb:
“If you can give your plant six hours of sun and a deep container, it’ll reward you all season long.”
Now that you know what makes cherry tomatoes special and which ones to choose, the next step is planning when and how to plant them — so you start strong and stay ahead of the season.
Before we move on, tell me — are you planning to grow in pots, a raised bed, or straight in the ground? That’ll help me guide your setup more precisely.
Planning & Timing – When and Where to Plant

If you get the timing wrong, everything else that follows becomes harder — even with the best soil and seeds. Over the years, I’ve seen new growers fail not because they lacked effort, but because they planted too early or too late. Timing and placement are the two silent factors that separate thriving plants from struggling ones.
Understanding Your Growing Zone and Last Frost Date
Before you drop a single seed, find out your USDA hardiness zone and your region’s last frost date. This tells you when it’s safe to move plants outdoors without risking cold damage.
You can check both quickly using the Old Farmer’s Almanac frost-date tool.
- For most US home gardeners, cherry tomatoes are warm-season plants — they love consistent daytime temperatures above 70°F (21°C) and nighttime temps that stay above 50°F (10°C).
- Plan to start seeds indoors 6–8 weeks before your last frost date, then move them out once nights are mild. If you’re planning to extend your tomato season or start seeds early, consider building a simple greenhouse setup — it protects young plants from cold snaps and gives you a head start. You can follow my step-by-step guide on how to build and maintain a greenhouse even if you’re working with limited space.
If you’re in a warmer state like Florida or Texas, you can plant almost year-round. Cooler regions (like the Midwest or Northeast) usually start between late March and early May. Knowing your window helps you align every other step — watering, feeding, pruning — to nature’s rhythm.
Indoor Seed-Starting vs Buying Transplants – Step-by-Step Timing
You’ve got two solid options to begin your cherry tomato journey: start from seed or buy ready-to-plant transplants. Both work — it’s just about your patience and setup.
1. Starting from Seed Indoors
- Start seeds 6–8 weeks before the last frost.
- Use small seed trays or paper cups with drainage holes.
- Keep soil temperature around 70–75°F for good germination.
- Once seedlings have 2–3 true leaves, move them into larger pots.
- Give them 14–16 hours of light daily (a sunny window or a grow light).
- Gently brush the tops with your hand once a day — this strengthens stems.
2. Buying Transplants
- Choose healthy plants about 6–8 inches tall with dark green leaves and no yellowing.
- Avoid ones that are already flowering — they may be root-bound.
- Transplants save you 1–2 months, which is great if your growing season is short.
Pro tip: If you’re new to gardening, start with one of each — a transplant and a few seeds. It’s the best way to learn both rhythms without pressure.
Site Selection – Full Sun, Drainage, Soil Temperature, Container vs Raised Bed
Tomatoes are sun-lovers. They need 6–8 hours of direct sunlight to produce sweet fruit. Choose the warmest, sunniest spot in your yard, balcony, or patio.
Here’s how to match your space to your plants:
- Full-sun areas (yards, patios): Perfect for in-ground beds or raised planters.
- Partial-sun balconies: Choose determinate varieties in light-colored containers (to keep roots cool).
- Windy or shaded spaces: Add reflective panels or grow lights to boost sunlight.
- Soil temperature: Wait until soil warms to 60°F (16°C) before planting outdoors.
- Drainage: Avoid spots where water pools after rain — soggy roots lead to rot.
Remember, cherry tomatoes aren’t picky — but they hate “wet feet.” If your space doesn’t drain well, raised beds or large containers are your best allies.
Planting & Setup (Step-by-Step)
This is the fun part — setting up your plants for success. Once you’ve chosen your timing and space, proper setup ensures strong roots and a consistent harvest.
Soil Preparation – Type, Amendments, pH, Compost, Slow-Release Fertiliser
Healthy soil is the foundation of a productive tomato plant. Think of it as their diet — whatever you feed them now will show up in your harvest later.
Here’s how I prep mine:
- Use well-draining loamy soil mixed with compost or aged manure.
- Ideal pH range: 6.0–6.8 (slightly acidic).
- Add one part compost to two parts soil for nutrition and moisture balance.
- Mix in a slow-release organic fertilizer before planting — it keeps feeding the roots gradually.
- Avoid compacted or clay-heavy soil; loosen it up with perlite or coco coir.
Planting Depth, Spacing, and Container Size Guidelines
Tomatoes love being planted deep. It helps them form strong root systems.
Here’s my go-to rule:
- Planting depth: Bury ⅔ of the stem, even if it means covering some leaves. Roots will grow from buried stems.
- Spacing:
- In garden beds: 18–24 inches apart.
- In containers: One plant per 12–14-inch pot (minimum 5 gallons).
- Container material: Plastic retains moisture better; terracotta looks great but dries faster.
If you’re using containers, add small stones or broken clay pieces at the bottom for drainage. Your plant will thank you later.
Support Systems – Cages, Stakes, Trellises; Container-Specific Supports
Cherry tomato plants can surprise you — they grow faster and taller than expected. Without support, they droop and rot. Set up supports right after planting to avoid root damage later.
- Cages: Great for indeterminate types; provide full support in all directions.
- Stakes: Perfect for determinate or patio varieties — just tie stems gently with soft ties.
- Trellises: Best for vertical gardens or space-saving setups.
For container plants, use lightweight bamboo stakes or mini cages that fit snugly inside the pot.
Transplant Care – Hardening Off, Watering In, Mulch
Before moving your seedlings outdoors, they need to “toughen up.”
Here’s how:
- Hardening off: Take them outside for a few hours each day, gradually increasing exposure over a week.
- Watering in: Right after planting, water deeply to settle the soil and eliminate air pockets.
- Mulch: Add a 2-inch layer of straw, compost, or shredded leaves to retain moisture and prevent weeds.
Your plants might look a little droopy the first day or two — that’s normal. Once the roots settle, they’ll bounce back stronger.
Daily & Weekly Care through the Growing Season

Now that your cherry tomatoes are in the ground (or pot), it’s all about steady care — small habits that keep them thriving.
Sunlight, Watering Frequency & Method (Beds vs Containers)
Cherry tomatoes are sun-hungry and sensitive to watering irregularities.
- Sunlight: Minimum 6–8 hours daily. Rotate containers weekly if sunlight shifts.
- Watering:
- Beds: 1–1.5 inches per week (deep watering twice a week is better than daily sprinkles).
- Containers: Check moisture daily; water when the top inch feels dry.
- Avoid overhead watering: It spreads diseases. Always water at the base.
Feeding/Fertilising Schedule – What Nutrients Cherry Tomatoes Need and When
Feed your plants like athletes in training — a steady, balanced routine works best.
- Use balanced 10-10-10 fertilizer every 2–3 weeks once fruiting begins.
- Supplement with liquid seaweed or fish emulsion during the flowering stage.
- Avoid overfeeding nitrogen — it gives lush leaves but few fruits.
- For organic growers: compost tea or worm castings every two weeks keeps the soil active.
Consistency is key. Think “less but regular” rather than dumping too much fertilizer at once.
Pruning, Training & Maintenance for Cherry Tomatoes
Pruning is more art than science. It keeps air flowing and redirects energy to fruit instead of excess leaves.
Here’s what I do:
- Pinch off small side shoots (“suckers”) that appear between leaf stems.
- Remove lower leaves once the plant starts fruiting — they often touch soil and spread disease.
- Tie vines loosely with soft twine as they grow taller.
- Check for pests every few days; early intervention saves the season.
Epic Gardening emphasizes light, frequent pruning — overdoing it can stress the plant.
Managing Heat, Humidity, and Seasonal Shifts
Extreme weather is every gardener’s test. When temps hit 90°F+, blossoms can drop.
Here’s how to handle it:
- Mulch well: It keeps roots cool and moisture consistent.
- Water early in the morning: Reduces evaporation and stress.
- Add shade cloth (30–40%) during heatwaves if you’re in southern zones.
- Humidity tip: Improve air circulation — a small fan helps if growing indoors or on balconies.
- In cooler zones: Cover plants with frost cloth on chilly nights to extend your season.
Think of your plant as a living system — your job is to balance sunlight, water, and protection as the weather changes.
Optimising Yield & Maximising Harvest
After years of growing cherry tomatoes in every kind of setup — from raised beds to small balcony pots — I’ve realized that yield isn’t just luck. It’s rhythm, observation, and timing. Once your plants start fruiting, your job shifts from nurturing to fine-tuning for continuous harvests.
Harvest Timeline – When to Expect First Fruits, How Many You Can Get
If you’ve started from seed, expect your first ripe cherry tomatoes in about 55–65 days after transplanting. Transplants usually shave off 2–3 weeks from that timeline.
Here’s what a healthy harvest pattern looks like:
- Early varieties (like Sungold, Sweet Million): Start fruiting in 55 days.
- Mid-season varieties: Ripen around 65–70 days.
- Late types (Black Cherry, Juliet): 75+ days but often yield heavier.
A single plant can produce 100–200 fruits per season in containers — even more in the ground if conditions are ideal. Once you see that first blush of color, you’ll usually pick every few days for several weeks straight.
This section keeps you motivated — because once you know what’s “normal,” you won’t panic when fruits take their time to ripen evenly.
Techniques for Continuous Harvesting (Successive Planting, Pruning for More Fruit)
To keep your tomato supply steady instead of boom-and-bust, you’ll want to stagger your planting and manage pruning smartly.
What works best for me:
- Successive planting: Start a new seed tray every 3–4 weeks through early summer. As one plant slows, the next starts producing.
- Cluster pruning: Remove small, overcrowded fruit clusters so the plant channels energy into fewer, larger fruits.
- Regular feeding: Use diluted compost tea every two weeks once harvesting starts — it keeps nutrient levels consistent.
- Harvest often: Picking every other day encourages plants to keep producing.
Think of it like a production line — you want overlapping batches, not a single rush.
Life in Containers or Small Spaces — Special Tips for Maximising Yield
Container growers often assume small space means small harvests. Not true. If you manage sunlight, soil, and feeding carefully, a 5-gallon pot can outperform an entire garden bed.
Here’s how:
- Use larger pots than you think: Go for minimum 5 gallons, ideally 7–10.
- Add compost mid-season: Scoop out 2 inches of topsoil and replace with fresh compost mix once fruiting begins.
- Train vertically: Use bamboo stakes or compact trellises to let vines climb upward instead of sprawling.
- Pollination boost: Gently shake the plant or use a soft brush to mimic bees indoors.
- Rotate containers weekly: It prevents one side from becoming light-deprived.
You don’t need acres — just a bit of creativity and consistent care.
What to Do at Season End – Transitioning, Repotting, Overwintering
Most people stop once the last tomato drops — but smart growers plan ahead.
Here’s what to do as the season wraps:
- In-ground plants: Pull up old vines and compost them (unless diseased).
- Containers: Empty the pot, refresh with new compost, and clean for reuse.
- Save seeds: Pick your healthiest fruits, ferment, and dry seeds for next year.
- Overwintering (optional): If you live in mild southern zones, prune your plant down to 6–8 inches and move it indoors to a sunny spot.
This step keeps your setup ready — so when spring hits, you’re not starting from scratch.
Troubleshooting Common Problems
Even the best plants hit bumps along the way. The key is learning to read the signs early and act fast. Most tomato issues come down to three areas — pests, disease, and environment.
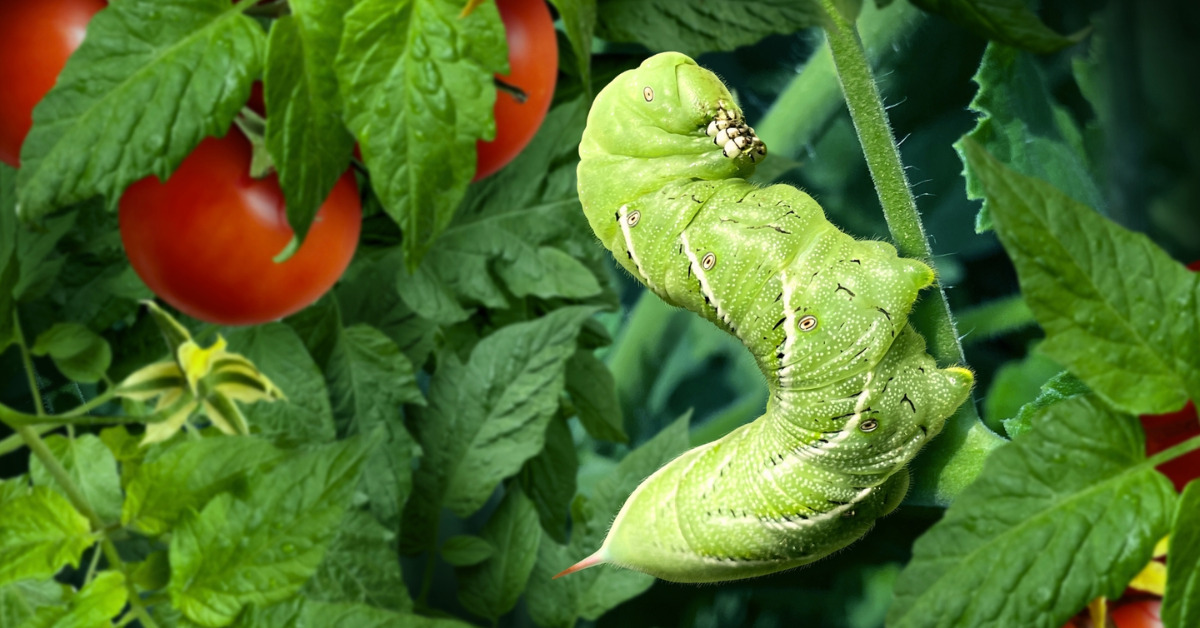
Pests (Hornworms, Aphids, Whiteflies) – Identification & Control
The first time I found a tomato hornworm, it had already eaten half a branch overnight. These pests move fast.
Here’s how to spot and stop them:
- Tomato hornworms: Big, green caterpillars with a horn-like tail. Handpick early morning; drop in soapy water.
- Aphids: Tiny green/yellow insects under leaves. Spray with neem oil or insecticidal soap weekly.
- Whiteflies: Cloud of small white bugs when you brush the plant. Hang sticky traps and keep airflow high.
Diseases (Early Blight, Blossom End Rot, Leaf Spot) – Prevention & Treatment
Tomatoes are magnets for fungal issues in humid areas. Prevention is easier than cure.
- Early blight: Yellow spots turning brown — prune infected leaves and spray with copper fungicide.
- Blossom end rot: Black, sunken fruit ends — caused by irregular watering or low calcium. Use crushed eggshells or lime in soil.
- Leaf spot: Small dark specks; remove lower leaves, improve airflow.
If you’re reusing containers, sterilize soil and pots before the next season to kill hidden spores.
Environmental Issues – Cracking, Blossom Drop, Sunscald, Poor Fruit Set
Environmental swings affect fruit more than you think.
- Cracking: Caused by uneven watering after dry spells — keep moisture steady. If you’ve ever noticed your tomatoes splitting after a rain or watering session, don’t worry — it’s one of the most common tomato issues. I’ve written a full guide explaining why tomatoes split and how to prevent it, so you can keep your harvest looking perfect all season.
- Blossom drop: Sudden heat or humidity changes; mist foliage lightly during heatwaves.
- Sunscald: Fruits turn pale or white on one side — provide partial shading.
- Poor fruit set: Often from lack of pollination; shake stems or attract bees with marigolds.
A quick adjustment in watering and airflow usually solves most of these.
Container-Specific Issues – Root Bound, Nutrient Depletion, Watering Mistakes
Container plants face unique limits.
- Root bound: If growth stalls mid-season, roots may have filled the pot. Repot or prune roots gently.
- Nutrient depletion: Replenish soil with compost or organic feed every 3–4 weeks.
- Overwatering: Let the top inch dry before watering again.
Remember, pots dry faster than ground soil — daily checks matter.
Harvesting, Using & Storing Cherry Tomatoes
You’ve watched them grow, ripen, and glow. Now comes the reward — harvesting and using them right so every bite tastes like sunshine.
How to Know When They’re Ripe and How to Pick
A ripe cherry tomato should feel firm but slightly soft, with deep, even color. Don’t wait for every fruit on the cluster to turn — pick the ripest ones every few days.
The Spruce notes that overripe fruit left on the vine can slow new growth and attract pests — so keep the rotation going.
When harvesting, gently twist the fruit until it snaps off, or use small scissors to avoid tugging at the vine.
Best Uses (Fresh Eating, Salads, Drying, Freezing) and Simple Recipe Ideas
Cherry tomatoes are incredibly versatile — use them the day you pick them for peak sweetness.
- Fresh: Toss with basil and olive oil for a 2-minute salad.
- Roasted: Bake with garlic and olive oil; perfect pasta base.
- Dried: Slice in half, sprinkle salt, and oven-dry at low heat for 4–5 hours.
- Frozen: Freeze whole in zip bags for winter sauces.
Use what you grow — it’s the best part of home gardening.
Storage & Shelf Life – Room Temperature, Freezing, Canning/Drying Tips
- Room temp: Keep on the counter (not fridge) for 4–5 days — refrigeration dulls flavor.
- Freezing: Store whole or roasted; lasts up to 8 months.
- Canning: Use boiling water bath method with a little lemon juice for acidity.
- Drying: Sun-dry or oven-dry, then store in olive oil for homemade “sun-dried” tomatoes.
A little prep keeps your hard work paying off long after the season ends.
Container & Balcony Grower Bonus Section

If you’re growing on a balcony or patio, this section is your blueprint. Small space? No problem — you can still grow like a pro.
Best Pot Sizes, Soil Mixes, and Drainage for Cherry Tomatoes on Balcony/Patio
- Use 5–10 gallon pots for one plant.
- Add coarse sand or perlite to soil for better drainage.
- Line pot bottoms with pebbles to prevent soggy roots.
- Use light-colored containers to avoid heat stress.
If you enjoy container gardening, you might also love growing chillies alongside your tomatoes. I’ve shared a complete beginner-friendly guide on how to grow chillies in pots for indoor and balcony spaces — they pair perfectly and thrive under similar care routines.
Good soil + consistent drainage = healthy, long-lasting plants.
Vertical Growing, Limited Space Planning, Companion Planting in Containers
Vertical setups are your secret weapon for tight spaces.
- Use trellises, wall grids, or railing hooks for upward growth.
- Pair with basil or marigolds in the same container — they deter pests and improve flavor.
- Use hanging baskets for trailing cherry varieties like Tumbler.
Even a 3×3 ft balcony can fit 2–3 productive plants if designed smartly.
Seasonal Extension Tips – Starting Earlier / Continuing Later with Containers or Indoors
- Start early indoors: Use grow lights to pre-sprout seedlings 8 weeks before frost.
- Use clear plastic covers or cold frames: Protect plants from early chills.
- In fall: Move pots indoors or near sunny windows to extend ripening.
- Rotate soil yearly: Keeps nutrients balanced for next season.
Balcony gardening gives you flexibility — your plants move with the season, not against it.
Final Thoughts
If there’s one thing I’ve learned after years of growing cherry tomatoes, it’s this — success comes from consistency, not perfection.
You don’t need fancy equipment or acres of land. What matters most is giving your plants the basics they crave:
- Sun: At least 6–8 hours daily — it’s their energy source.
- Soil: Rich, loose, and full of organic matter.
- Water: Deep and steady — never too little, never too much.
- Space: Enough room to breathe and grow strong roots.
When you balance these four elements, even a single pot can yield bowls of bright, sweet cherry tomatoes that outshine anything store-bought. And the best part? Every season teaches you something new — patience, observation, and the quiet joy of growing your own food.
If you’ve followed this guide from start to finish, you’re already ahead of most beginners. You know the why behind every step — and that’s what makes a confident gardener.
Before you head out to plant, I’d love to hear from you — What’s your biggest challenge or goal this growing season? Drop your thoughts in the comments or share your experience on Plant Care Dairy. Your story might just inspire someone else to start their first tomato plant.
Disclaimer: Results may vary based on your local climate, soil type, and growing conditions. Always check with your local extension service for region-specific advice before planting or using fertilizers and treatments. The tips shared here are based on personal experience and trusted gardening sources for general guidance only.